

Air fryer quesadillas are an incredibly quick and easy snack, appetizer, or family meal that you can load up with tasty fillings and cheese! My family loves using leftover taco meat from Taco Night, and Monterey Jack is a personal favorite for super melted results! Best of all, they cook quickly and crisp up beautifully!
Easy Air Fryer Quesadillas
Back again with the incredible AIR FRYER! This time, my favorite kitchen appliance takes an easy recipe and makes it even easier - quesadillas!
In my house, this simple meal was more popular than mac n’ cheese when my kids were little - they begged for it! I still make them frequently because they are so versatile and nearly effortless!

Jump to:
🌎 Origin
Quesadillas are a traditional Mexican recipe dating from the Aztec days of the 16th century. Back then, they were often a sweet treat, filled with pumpkin or squash, but they evolved into a savory favorite.
Quesadillas can be filled with a variety of ingredients, but cheese is always a main component, making them gooey and delicious. In fact, the word quesadilla literally means “little cheesy thing”!
🥘 Air Fryer Quesadilla Ingredients, Notes, & Substitutes
- Flour Tortillas - 2 flour tortillas. Corn tortillas are traditional and can also be used, but flour tortillas are softer, more durable, and better if you plan on lots of fillings. *Learn to make homemade flour tortillas here!
- Ground Beef Taco Meat - ½ cup of cooked taco meat. Homemade taco seasoning makes it taste more authentic. You can also use ground turkey or chicken. (Or, use my quick and easy recipe for ground beef taco meat!)
- Monterey Jack Cheese - ½ cup of Monterey Jack cheese. It's a mild cheese that melts well, but any shredded cheese will work. I also love the Mexican Blend of shredded cheese - a combo of 4 yummy kinds of cheese!
*Be sure to see the free printable recipe card below for ingredients, exact amounts & instructions with tips!*
🔪 How To Make Air Fryer Quesadillas
No need to preheat your air fryer before assembling these quick quesadillas! Just jump right into assembly and get ready to enjoy this hearty snack or easy meal!
You'll need your air fryer, some kitchen tongs, and a cheese grater if shredding your own cheese! This recipe makes 2 quesadillas, but you can always make more and work in batches!
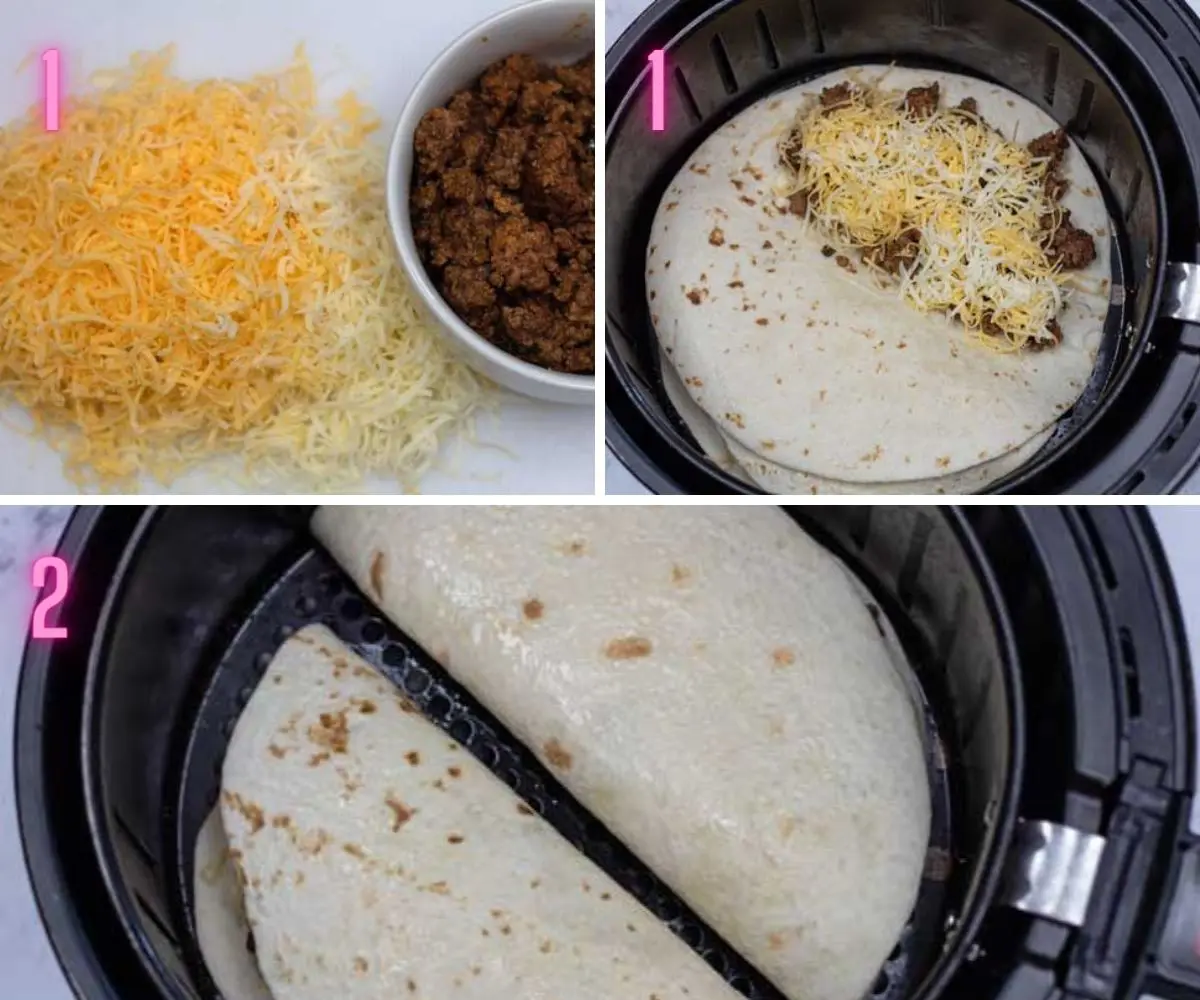
Step 1: Fill the tortillas. Cover 1 side of each tortilla with half (about ¼ cup/56.25 grams) of the taco meat (or another meat or filling of your choice). Next, sprinkle about ¼ cup (28.25 grams) of shredded Monterey Jack cheese (or your favorite cheese) and fold the tortilla in half. *Add more filling as desired and repeat the process with each tortilla until you have the amount you need prepared.
Step 2: Air Fry. Place the assembled tortilla into the air fryer basket. Two folded tortillas should fit at one time. Cook at 350°F (175°C) for 5 full minutes. Flip the tortillas over and fry for another 3+ minutes or until the tortillas are a crispy, golden brown.
Step 3: Remove quesadillas from the air fryer and serve right away.
🍽️ What To Serve With Air Fryer Quesadillas


Top your quesadillas with my delicious pico de gallo or other traditional toppings like guacamole, salsa, or sour cream. Salsa Verde is a favorite at my house!
For sides, you can never go wrong with Mexican restaurant-style rice and refried black beans. A side of tortilla chips never hurts, either! Enjoy!
💭 Tips & Notes
- When using the air fryer for quesadillas, the tortilla might pull away from the fillings while cooking. You can check on it during the first few minutes of cooking and press it down with a spatula if necessary.
- The cooking time may vary depending on the make and model of your air fryer, so use my instructions as a guide, but keep an eye on your quesadillas.
- Using aerosolized cooking sprays to coat your air fryer basket or trays can damage the coating, so use a spray bottle or a pastry brush to coat them with oil instead, although this particular recipe doesn’t call for oil.
- Choose a great melting cheese that won't result in super greasy quesadillas. Monterey Jack is one of my top picks for this and can be used in combination with cheddar for the perfect quesadillas. Or skip the cheddar/Jack combo and use Colby-Jack!
📖 Variations
Air fryer quesadillas can be made with all kinds of fillings (this even works for breakfast quesadillas)! A fun idea is to have a “quesadilla bar” (similar to this taco bar) where everyone assembles their own and takes turns placing them in the fryer.
You can get really creative with this simple recipe and make your quesadillas much more than a “little cheesy thing”! Here are a few great filling ingredients:
- Roasted Bell Peppers and Onions (or roasted vegetables)
- Diced Onions
- Diced Tomatoes
- Pico de Gallo
- Cilantro
- Guacamole (or diced avocado)
- Salsa (red, green, etc.)
- Taco Meat (I like having a couple of options - ground beef is always popular, and shredded chicken is another favorite!)
*Note that the best and crispiest air-fried quesadillas will result from choosing fillings that are drier rather than moist.
🥡 Storing & Reheating
Allow the cooked quesadillas to cool completely, then wrap them individually in plastic cling film wrap and place them into an airtight container. Store any leftover quesadillas in the refrigerator for up to 3 days.
Freezeing Quesadillas
To freeze your quesadillas (assembled or cooked), place the individually wrapped quesadillas onto a baking sheet, then transfer to the freezer. Once frozen, place them into an airtight freezer container or freezer storage bag.
Reheating Quesadillas
For best results, place frozen quesadillas into the refrigerator to thaw before reheating. You can reheat them in your air fryer, oven, skillet, or microwave!
How to Reheat Quesadillas in an Air Fryer (best choice) - For a crispier reheated quesadilla, preheat your air fryer to 350 degrees F (175 degrees C). Cook for 2-3 minutes or until crispy and warmed through.
*See my full post on how to reheat quesadillas for more detailed instructions!
>>>>See all of my recipes here<<<<
❓ FAQ
Quesadillas are always best right after cooking when they are about as crispy as can be. However, using fillings that will not add excessive moisture is key to keeping your quesadillas from getting soggy before they can be fully enjoyed.
Yes, most definitely! Whether you're using your air fryer or a skillet, you can always cook up a bigger batch than needed and freeze the cooked quesadillas for later. Transfer frozen quesadillas to the fridge to thaw, then follow my instructions above for reheating to perfection!
The best option for reheating quesadillas is to use your air fryer (if available). My next best choice is reheating in the oven, followed by stovetop reheating in a skillet or frying pan. Instructions for each method are above.
Do you love a recipe you tried? Please leave a 5-star 🌟rating in the recipe card below and/or a review in the comments section further down the page.
Stay in touch with me through social media @ Pinterest, Facebook, Instagram, or Twitter! Subscribe to the newsletter today (no spam, I promise)! Don't forget to tag me when you try one of my recipes!
📖 Recipe Card

Air Fryer Quesadillas
Ingredients
- 2 medium flour tortillas (you should be able to fit one flat tortilla into the air fryer basket)
- ½ cup ground beef taco meat (cooked)
- ½ cup Monterey jack cheese (shredded)
Instructions
Assemble
- Assemble the quesadillas by filling one-half of each tortilla with ¼ cup of ground beef taco meat (or another filling of your choice) and topping it with ¼ cup of the shredded Monterey jack cheese (or your favorite cheese).
- Fold the tortilla in half to close the quesadilla. *Add more of the filling and cheese if desired. Repeat with the second tortilla, and so on.
- Transfer the assembled quesadillas into your air fryer basket.
Air Fry
- Cook for 5 minutes at 350°F (175°C), then flip and cook an additional 3-5 minutes, or until golden and crispy. *The tortilla will tend to lift or 'fly away' from the fillings; use a spatula and push it back down into place in the first few minutes of cooking.
- Remove the quesadillas from your air fryer and serve immediately.


David C Deeley says
What a great recipe idea I'll start checking out your other airfryer recipes thanks