
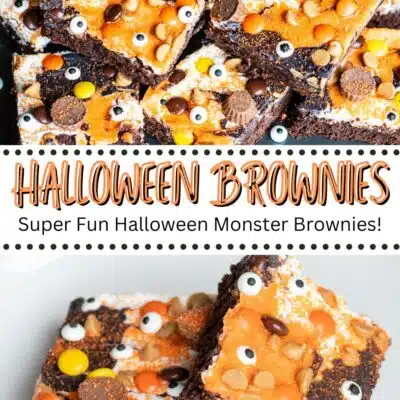
These Halloween brownies are rich, fudgy, indulgent, and extra festive with some Halloween-colored ganache and sweet candies! They are easy to make, a perfect baking activity for the kids, and incredibly delicious! Serve these at your next Halloween party, and watch them disappear!
Fun Halloween Brownies With Candy
Halloween is such a fun holiday that I always try to make as many festive treats as possible! Reese's Pieces Halloween cookies, Halloween baked cheese mummies, and Halloween crescent roll witch hats are some of my recent favorites, but these rich brownies definitely make the list, too!

Jump to:
For more fun treats, try out some of my favorite Halloween cookie recipes, Halloween treats, and Halloween cupcakes!
🥘 Halloween Brownies Ingredients, Notes, & Substitutions
You'll definitely need to make a grocery store run for all the fun decorations and colored melting chocolate. However, everything should be pretty easy to find this time of year!

Brownie Ingredients
- Butter - 1 cup of butter that has been melted and then cooled slightly.
- Coconut Oil - 2 tablespoons of coconut oil (or your preferred cooking oil).
- Sugar - 1¼ cups of white, granulated sugar.
- Brown Sugar - 1 cup of brown sugar, packed.
- Eggs - 4 large eggs that are at room temperature.
- Vanilla - 1 tablespoon of vanilla extract (or use a vanilla extract substitute).
- Flour - 1 cup of all-purpose flour, spooned and leveled.
- Cocoa Powder - 1 cup of unsweetened cocoa powder.
- Chocolate Bar (optional) - For an extra hit of chocolate, you can grate 1.55-2 ounces of milk chocolate or semi-sweet chocolate bar to be folded into the batter.
Ganache Ingredients
- Melting Wafers - You will need ¼ cup each of black, orange, and white melting wafers. These colors should be relatively easy to find around Halloween on the baking aisle. If you can't find them, order them online or use white melting wafers and add food coloring.
- Heavy Whipping Cream - ⅓ cup of heavy whipping cream that will be heated and then divided into 3 equal portions.
Candy Topping Ingredients
- Reese's Pieces - ¼ cup of Reese's Pieces.
- Reese's Peanut Butter Cups - ¼ cup of mini Reese's Peanut Butter Cups.
- Peanut Butter Chips - ¼ cup of peanut butter baking chips (they'll be located next to the chocolate chips).
- Orange Sanding Sugar - For some extra decoration.
- Candy Eyes - Grab some candy eyes in various sizes for a little spooky effect!
*Be sure to see the free printable recipe card below for ingredients, exact amounts & instructions with tips!*
🔪 How To Make Halloween Brownies
There are 3 parts to whipping up these delicious brownies: the brownies themselves, the colorful ganache, and the candy topping! All of these are pretty quick and simple to do, you can even let the kids help out!
You will need a 9x13 baking dish, measuring utensils, mixing bowls, a sieve, and a silicone spatula.
One batch of these Halloween brownies can be cut into 18 bars, but feel free to make them as large or small as you want!
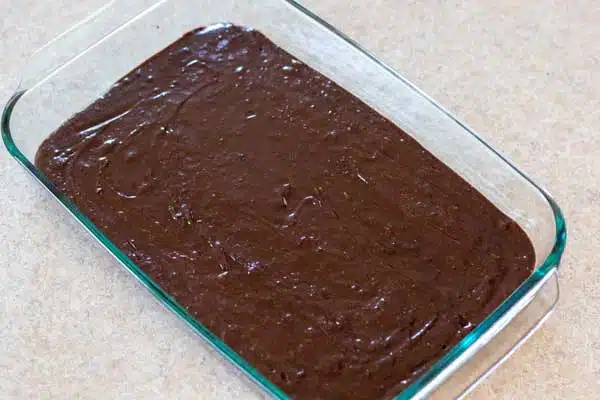
Mix The Brownie Batter


Step 1: Preheat. Preheat your oven to 350°F (175°C/Gas Mark 4) and lightly spritz a 9x13 baking dish with some non-stick cooking spray. You could also line the pan with some overhanging parchment paper if desired.
Step 2: Mix. Using your stand mixer or a mixing bowl, combine 1 cup (227 grams) of butter, 2 tablespoons (30 milliliters) of coconut oil, 1¼ cups (250 grams) of sugar, 1 cup (220 grams) of light brown sugar, and ¼ teaspoon of salt.
Step 3: Combine. Add the 4 large eggs (200 grams) and 1 tablespoon (15 milliliters) of vanilla extract and stir until thoroughly combined.
Step 4: Add dry ingredients. Using a sieve over the bowl, sift 1 cup (125 grams) of all-purpose flour and 1 cup (86 grams) of unsweetened cocoa powder directly into your bowl of wet ingredients. Then, use a silicone spatula to fold everything together without overmixing the batter.
Step 6: Add chocolate. If using the optional 1.55-ounce (44 grams) chocolate bar, fold it into the batter with your spatula.
Bake The Brownies

Step 7: Bake. Move the baking pan to the oven and bake at 350°F (175°C/Gas Mark 4) for 35-40 minutes, or until a toothpick can be poked into the center and removed without any wet batter on it.
Step 8: Cool. Take your brownies out of the oven and let them cool for at least 15 minutes before you move them to a wire rack to cool completely.
Prepare The Ganache


Step 9: Prepare. Place each color of melting wafers into a separate bowl (¼ cup (56.5 grams) each of black melting wafers, orange melting wafers, and white melting wafers).
Step 10: Heat. Heat your ⅓ cup (79 milliliters) of heavy whipping cream in the microwave until it only just starts to bubble.
Step 11: Pour. Divide the heavy whipping cream into 3 equal portions (1 tablespoon + 1¼ teaspoon each) and add it to each of the bowls with the melting wafers.
Step 12: Melt. Let the combination sit for 1 minute, and then stir each color until the wafers have fully melted.
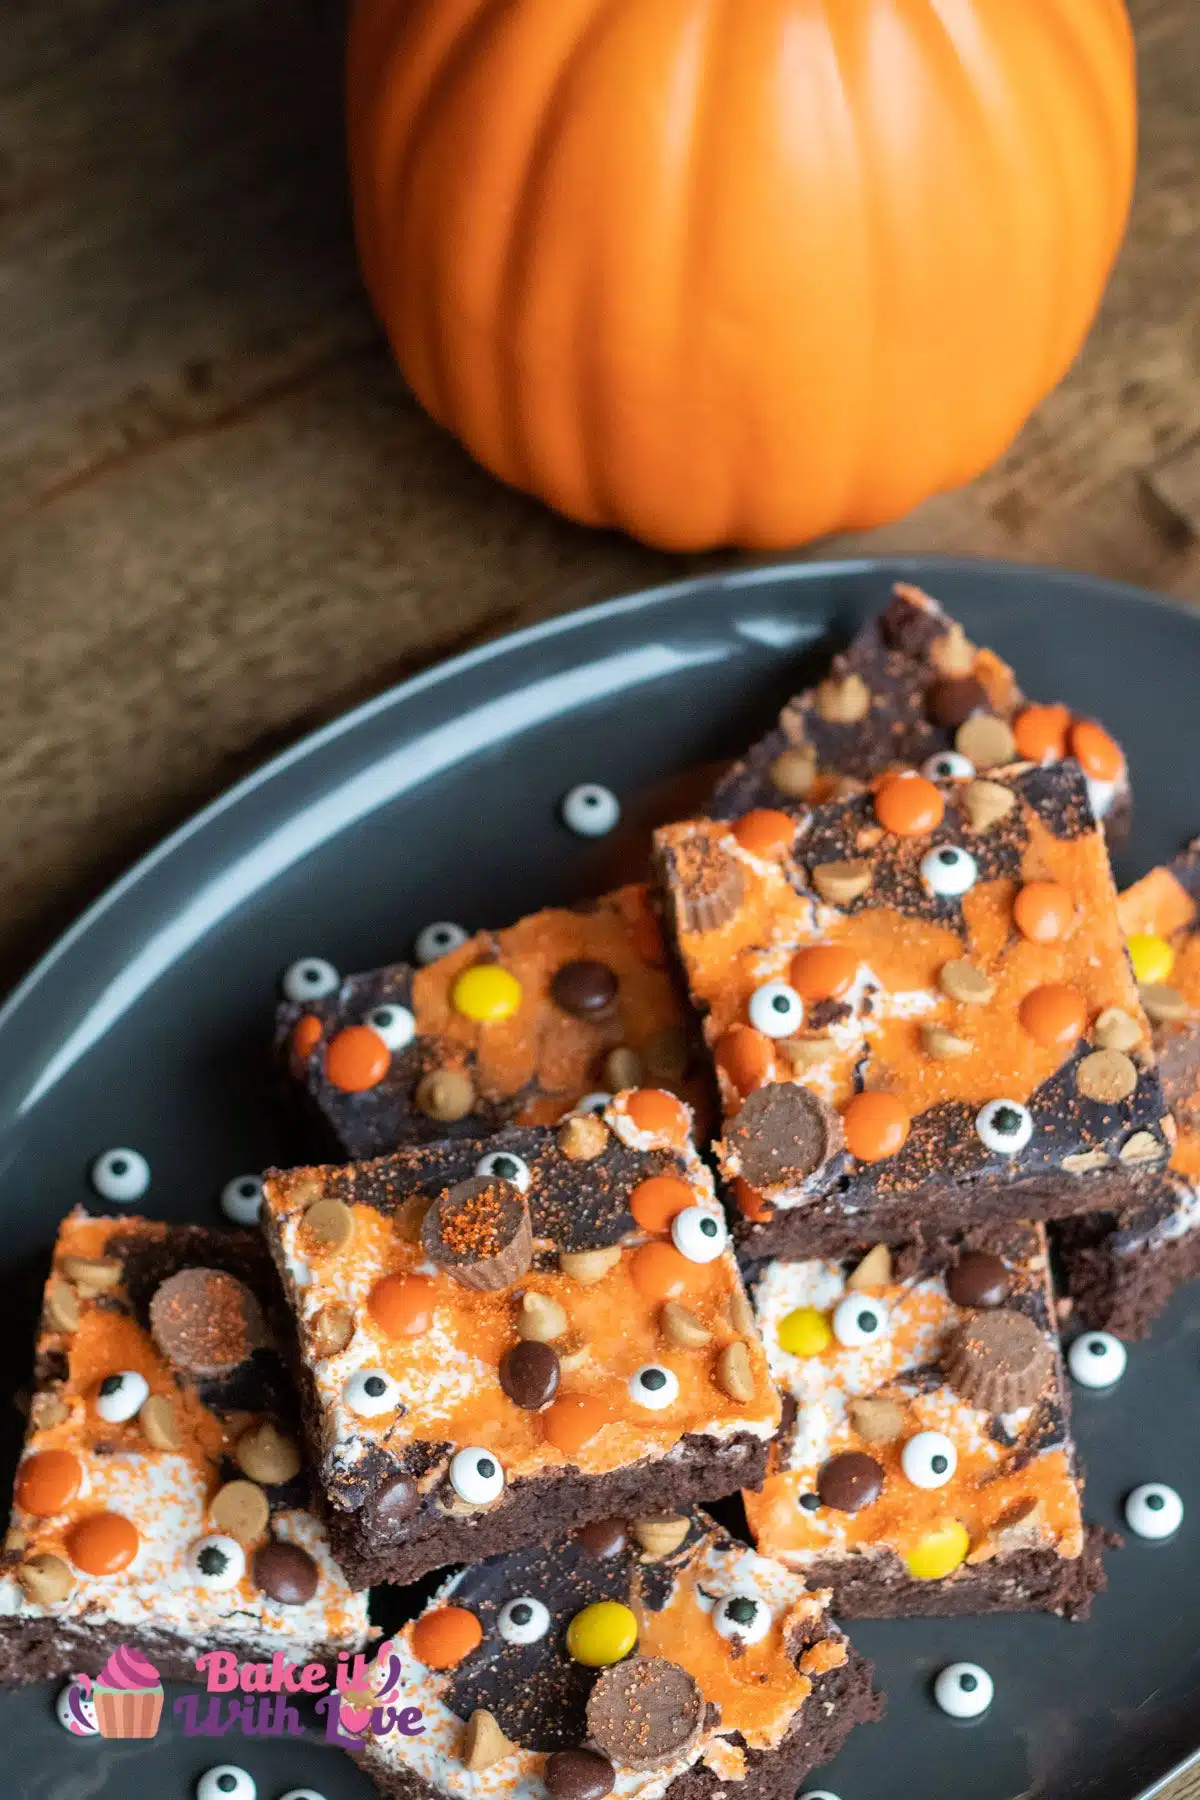
Step 13: Swirl. Add dollops of the various colors of ganache over the top of the cooled brownies. You can leave this design as-is or use a toothpick to gently swirl the colors together.
Add The Topping

Step 14: Decorate. Scatter your ¼ cup each of Reese’s Pieces, mini Reese’s Peanut Butter Cups, Reese’s peanut butter chips, as well as orange sanding sugar and candy eyes over the top of the brownies.
Step 15: Serve. Let the ganache finish setting, and then slice and serve.
💭 Tips & Notes
- For an extra fudgy brownie, bake them for only about 30 minutes. Make sure to give them plenty of time to cool so that they finish setting up.
- If you want a more cake-like brownie, up the cooking time closer to 40 minutes.
- Feel free to add any of your favorite Halloween candy as a topping! Pretzels, sprinkles, or crushed cookies would also be a great choice!
- When placing the candy eyes, make sure your hands are completely dry or the black part of the eyes will smear.
🥄 Make Ahead Options
You can prepare these brownies as directed and then let them cool completely. Place them into the fridge in a sealed container (with parchment paper separating any layers) for up to 2 days if needed.

🥡 Storing
You'll want to store these tasty brownies at room temperature for up to 4 days, but make sure they are in an airtight container!
If you are having an outdoor event where you will be serving these brownies, go ahead and keep them in a cooler until ready to serve. If you let them sit out in the hot sun, the ganache and candies can start to melt.
>>>>See all of my recipes here<<<<
❓ FAQ
Absolutely! Simply swap out all of the peanut butter-based candies for your favorite peanut-free alternatives. Crushed cookies, pretzels, or festive sprinkles would still look great!
Using parchment paper to line your baking dish makes removing these brownies from the pan extra easy. Make sure they are completely cool and then use a sharp knife that has been run under hot water and then dried with paper towels to slice the brownies. This will make perfectly clean edges that look the best!
The possibilities are essentially endless! I wouldn't recommend using gummy candies, but chocolate, peanut butter, or crunchy sweets would work great! You could also just chop up your favorite chocolate bars and use that!
Do you love a recipe you tried? Please leave a 5-star 🌟rating in the recipe card below and/or a review in the comments section further down the page.
Stay in touch with me through social media @ Pinterest, Facebook, Instagram, or Twitter! Subscribe to the newsletter today (no spam, I promise)! Don't forget to tag me when you try one of my recipes!
📖 Recipe Card

Halloween Brownies
Ingredients
Brownie Ingredients
- 1 cup butter (melted, cooled)
- 2 tablespoon coconut oil (or preferred cooking oil)
- 1¼ cups sugar
- 1 cup light brown sugar (packed)
- ¼ teaspoon salt
- 4 large eggs (at room temperature)
- 1 tablespoon vanilla extract
- 1 cup all-purpose flour (spooned and leveled)
- 1 cup unsweetened cocoa powder
- 1.55 oz chocolate bar (optional, milk chocolate or semi-sweet - grated, up to 2 ounces)
Ganache Ingredients
- ¼ cup black melting wafers
- ¼ cup orange melting wafers
- ¼ cup white melting wafers
- ⅓ cup heavy whipping cream (divided)
Topping Ingredients
- ¼ cup Reese’s Pieces
- ¼ cup mini Reese’s Peanut Butter Cups
- ¼ cup Reese’s peanut butter chips
- orange sanding sugar
- candy eyes (various sizes)
Instructions
Mix The Brownie Batter
- Preheat your oven to 350°F (175°C/Gas Mark 4) and lightly spritz a 9x13 baking dish with some non-stick cooking spray. If desired, you could also line the pan with some overhanging parchment paper.
- Using your stand mixer or a mixing bowl, combine 1 cup butter, 2 tablespoon coconut oil, 1¼ cups sugar, 1 cup light brown sugar, and ¼ teaspoon salt.
- Add the 4 large eggs and 1 tablespoon vanilla extract and stir until thoroughly combined.
- Using a sieve placed over the bowl, sift your 1 cup all-purpose flour and 1 cup unsweetened cocoa powder directly into the wet ingredients. Then, use a silicone spatula to fold everything together, without overmixing the batter.
- If using the optional 1.55 oz chocolate bar, fold it into the batter with your spatula.
Bake The Brownies
- Transfer the baking dish to the oven and bake at 350°F (175°C/Gas Mark 4) for 35-40 minutes, or until a toothpick can be poked into the center and removed without any wet batter on it.
- Remove your fudge brownies from the oven and let them cool for at least 15 minutes before you transfer them to a cooling rack to cool completely.
Prepare The Ganache
- Place each color of melting wafers into a separate bowl (¼ cup black melting wafers, ¼ cup orange melting wafers, ¼ cup white melting wafers).
- Heat your ⅓ cup heavy whipping cream in the microwave until it only just starts to bubble.
- Divide the heavy whipping cream into 3 equal portions (1 tablespoon + 1¼ teaspoon each) and add it to each of the bowls with the melting wafers.
- Let the combination sit for 1 minute and then stir each color until the wafers have fully melted.
- Add dollops of the various colors of ganache over the top of the cooled brownies. You can leave this design as-is, or use a toothpick to gently swirl the colors together.
Add The Topping
- Scatter your ¼ cup Reese’s Pieces, ¼ cup mini Reese’s Peanut Butter Cups, ¼ cup Reese’s peanut butter chips, orange sanding sugar, and candy eyes over the top of the brownies.
- Let the ganache finish setting and then slice and serve.
Notes
- For an extra fudgy brownie, bake them for only about 30 minutes. Make sure to give them plenty of time to cool so that they finish setting up.
- If you want a more cake-like brownie, up the cooking time to closer to 40 minutes.
- Feel free to add any of your favorite Halloween candy as a topping! Pretzels, sprinkles, or crushed cookies would also be a great choice!
- When placing the candy eyes, make sure your hands are completely dry or else the black part of the eyes will smear.
- Store these tasty brownies in an airtight container at room temperature for up to 4 days.
- To make in advance: You can prepare these brownies as directed and then let them cool completely. Place them into the fridge in a sealed container (with parchment paper separating any layers) for up to 2 days if needed.
- If you are having an outdoor event where you will be serving these brownies, go ahead and keep them in a cooler until ready to serve. If you let them sit out in the hot sun, the ganache and candies can start to melt.
Nutrition

Angela is an at home chef that developed a passion for all things cooking and baking at a young age in her Grandma's kitchen. After many years in the food service industry, she now enjoys sharing all of her family favorite recipes and creating tasty dinner and amazing dessert recipes here at Bake It With Love!


Comments
No Comments