
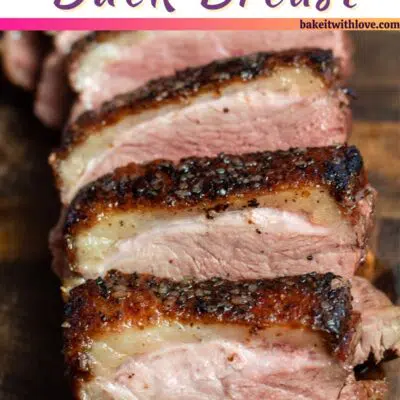
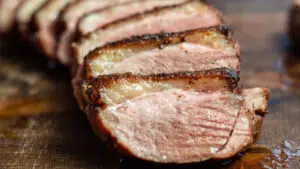
Pan-seared duck breast is such an easy dinner to make, and it’s perfect for date night or any night when you want to elevate dinner. I sear the duck breasts until they are golden brown, crispy, and tender.
Serve the duck for dinner with Parmesan roasted mashed potatoes, a simple green salad, or sautéed asparagus & cherry tomatoes!

Jump to:
Unless you grew up with it, duck is probably not a part of your regular dinner rotation.
We always served duck on special occasions like Valentine’s Day, birthdays, or big celebrations.
It’s often considered a fancy meal reserved for expensive restaurants, but you can easily make it home! My pan-seared duck breast is delicious, impressive, and simple.
Start with a cold skillet, then just add a dry, seasoned duck breast, and fry! That’s all you need to turn this simple protein into an amazing dinner.
Love duck? Try my Smoked Duck and Mushroom Risotto, Duck with Orange Sauce, Creamy Duck & Wild Rice Soup, Duck Confit, or Whole Roasted Duck.
🥘 Ingredients
There are just two ingredients here! Duck breasts and a simple seasoning of salt and pepper! The salt and pepper highlight the delightful, rich flavor of the duck breasts without overwhelming the duck flavor.
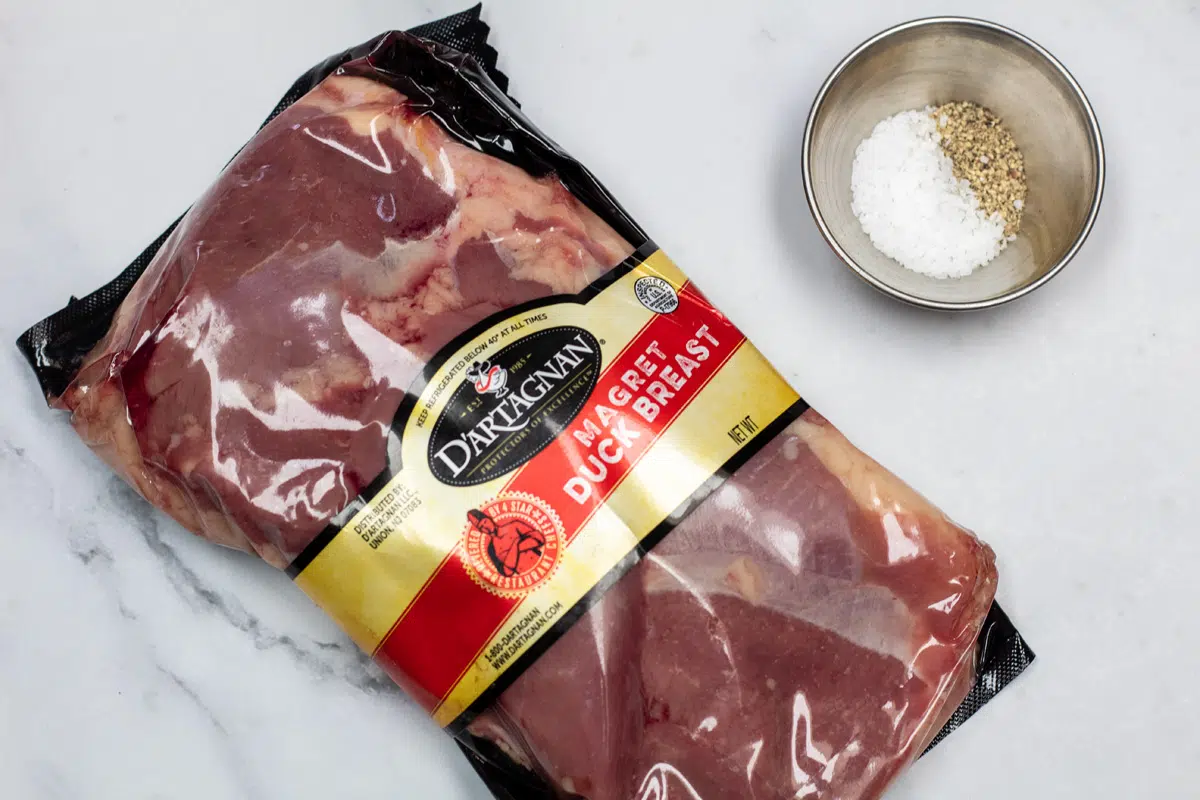
- Duck Breast – 12 ounces of duck breast. If you can find fresh duck breast, I recommend using it! Otherwise, frozen duck works well—just make sure the duck breasts are completely defrosted before using.
- Salt & Pepper – This will be according to taste! I like a simple seasoning on my duck breasts, but you can season them according to the flavor profiles you enjoy! (*See notes below)
Be sure to see the free printable recipe card below for ingredients, exact amounts & instructions with tips!
🔪 How To Pan-Seared Duck Breast
Crispy pan-seared duck is an elegant main course that seems difficult – but it’s so easy to make. There are two options for finishing your duck breasts – pick whichever method you prefer.
Grab some paper towels, a sharp knife, a large skillet, and some silicone kitchen tongs to get started. I made 2 duck breasts this time, but you can always make more if you work in batches.
Prep & Score
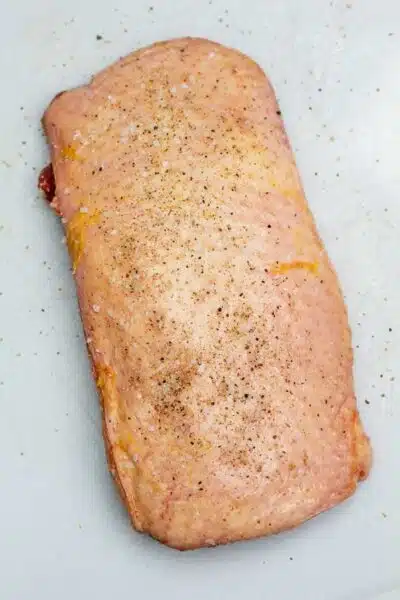
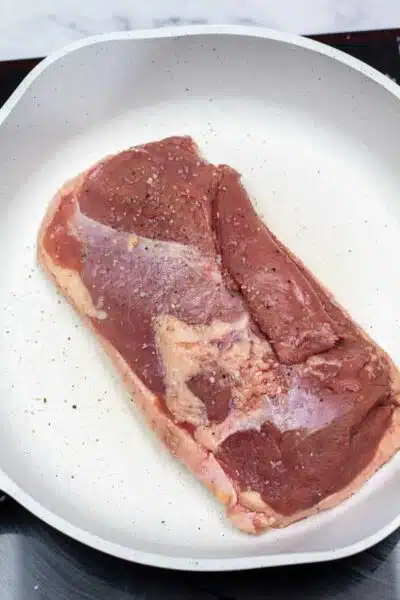
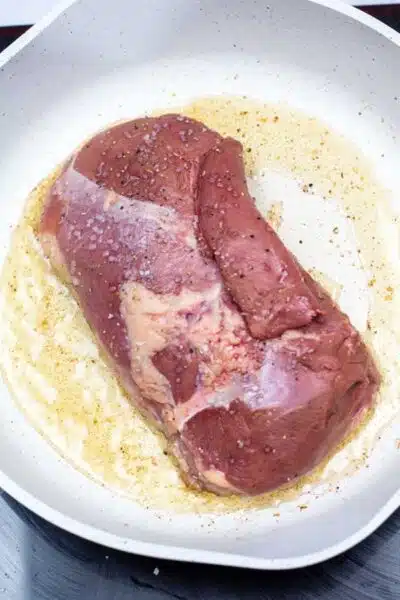
- Rinse 2 duck breasts under cool water and pat them very dry using paper towels. Optionally, you can use a very sharp knife to score the duck breast skin in a diamond pattern. Just make sure not to cut so deeply that you slice into the meat!
Season
- Next, pick a skillet or frying pan that will provide ample frying room for your duck portions. Season both sides of your prepared duck breasts generously with salt and pepper, then place the duck breasts into a skillet while it is still cold.
Sear
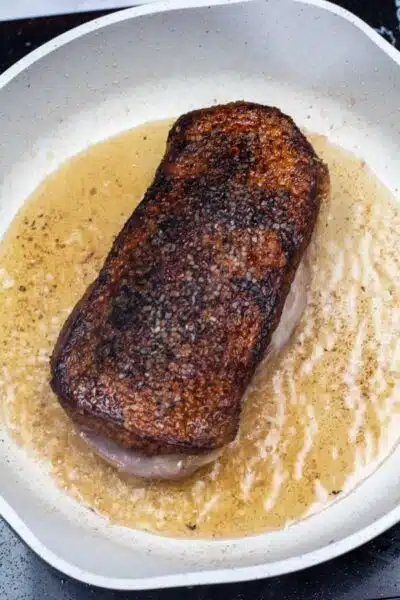
- Heat your skillet with the duck breast portions over low heat for the first 3 minutes. Then, increase the heat to medium. Once the duck breast is sizzling and the fat is starting to render off, leave the duck breast undisturbed. Continue to sear with the fat side down to cook for an additional 6 to 8 minutes. Then, drain or spoon off the excess duck fat from your skillet. (Save the fat to make duck-fat fried potatoes!)
Option 1 Skillet Finish
- To finish your duck breasts in the skillet, flip after the fat has fully been rendered and the skin is golden and crispy. Cook for 2 to 4 minutes or until your duck is done.
Option 2 Oven Finish
- To finish your duck breasts in the oven, either make sure your skillet is oven-safe or preheat a clean, rimmed baking sheet at 400°F (205°C) while starting your duck portions in your skillet. When ready, transfer your duck breasts to your baking sheet with the skin side down and roast in the oven for 4 to 6 minutes.
Rest & Serve
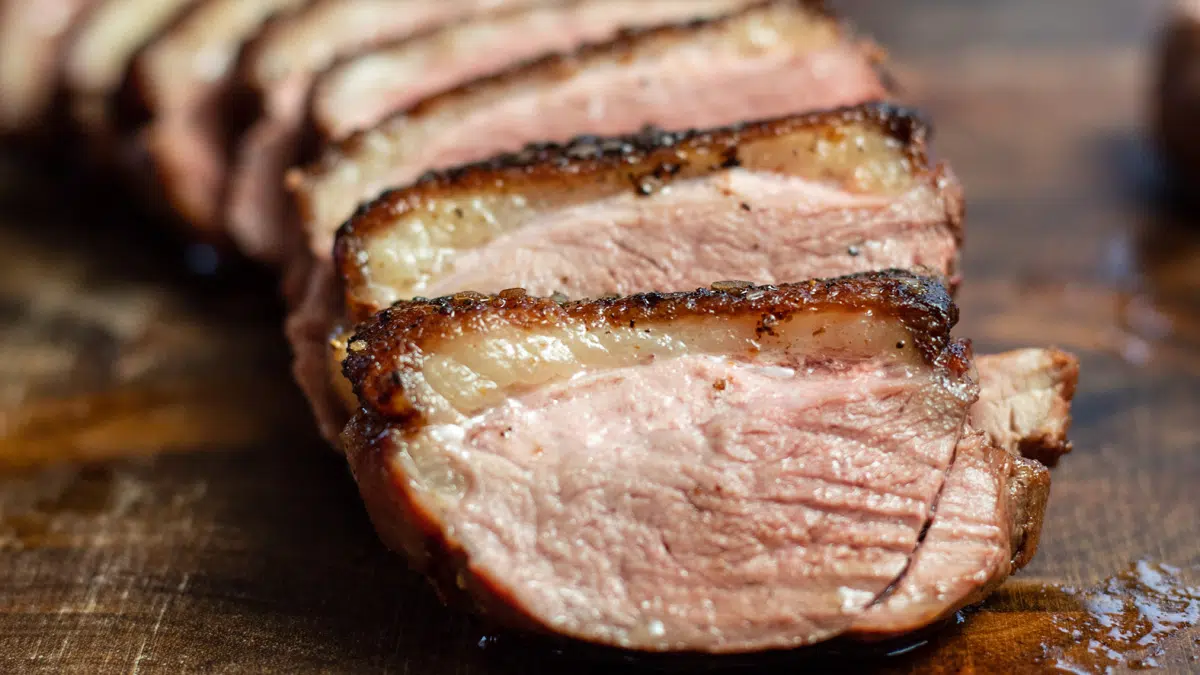
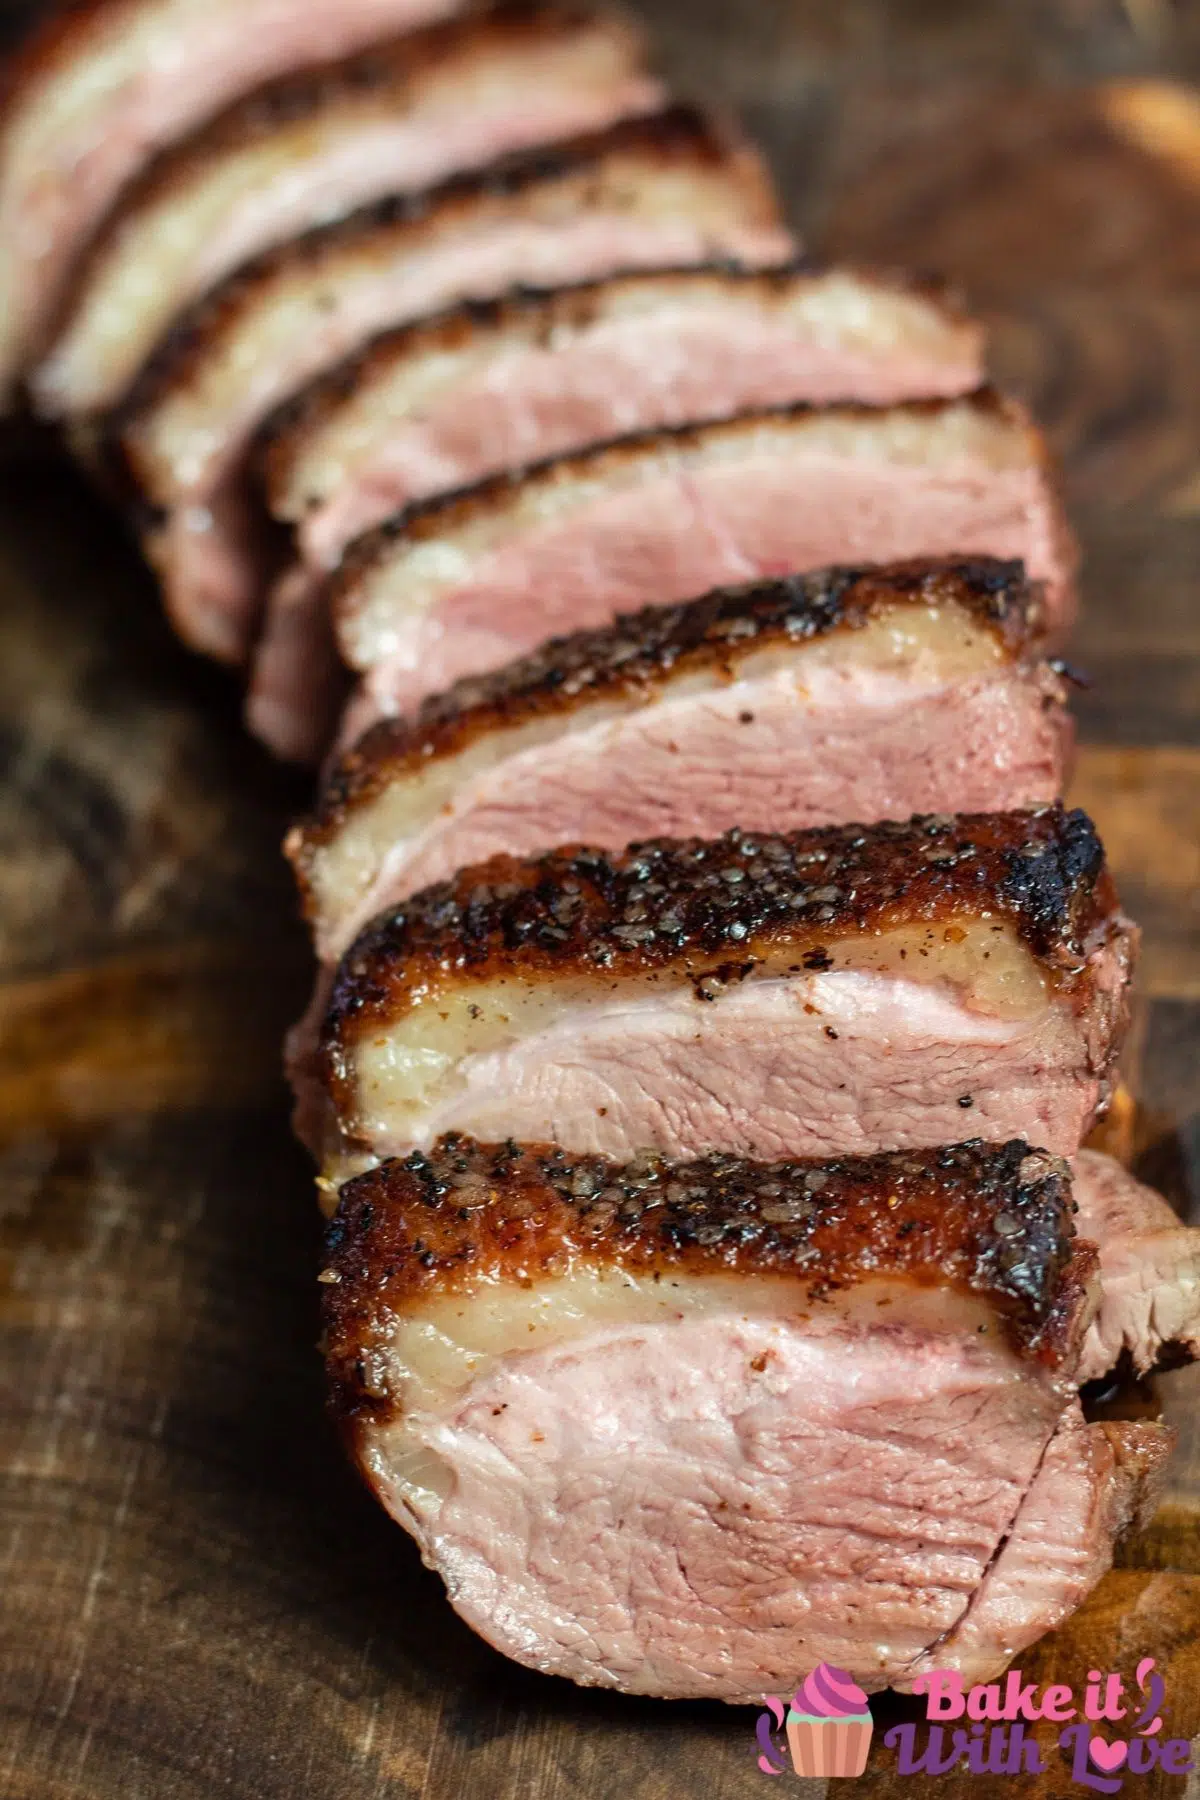
Cook your duck until it has an internal temperature of 130°F (54°C), then remove it from your skillet or oven. Allow the duck breast(s) to rest at room temperature for about 10 minutes before slicing and serving.
💭 Angela's Pro Tips & Recipe Notes
- Slicing Duck Breast: When serving duck breast, aim for slices about ½ inch thick. Thinner slices tend to cool down quickly.
- Cooking Temperature: While the USDA suggests cooking duck to 165°F (74°C), many find this results in overcooked meat. Adjust the cooking temperature according to your personal preference for the best experience.
- Utilizing Excess Duck Fat: Don't discard the duck fat you drain off. It's excellent for frying eggs, making crispy duck fat potatoes, or creating a savory pan gravy or sauce to accompany the duck.
- Seasoning: Keeping the seasoning simple allows the duck's flavor to shine, but feel free to enhance it with your favorite spices. Garlic powder, onion powder, or fresh herbs like herbes de Provence can add a delightful touch.
>>>See All Of My Tasty Recipes Here!<<<
🥡 Storing & Reheating
If you have leftover duck, you can easily store it in your fridge. I recommend not slicing any duck you wish to eat later.
Wrap it tightly in plastic cling film or transfer it to an airtight container. When properly stored, the duck will keep for just 2 days.
Freezing
I recommend eating the duck as freshly as possible, but if you must, you can freeze the duck breast for up to 2 months. Make sure to wrap the cooled duck in plastic cling film, then place it in a heavy-duty freezer bag or airtight container to keep it at the best quality.
Let it thaw in your fridge overnight the day before you’re ready to eat.
Reheating
When you reheat you want to get the skin crispy again but don’t want it to overcook. Try reheating in a 350°F (175°C) oven for about 5 to 10 minutes or until it reaches your desired temperature.
Then, put the duck breast skin side down in a skillet over medium to medium-high heat and fry until the skin is crispy again- about five minutes. Let the reheated duck breast rest for 5-10 minutes, then slice and serve it up.
❓ Recipe FAQs
Most of us who enjoy eating duck agree that medium is the best temperature to serve duck! This is because duck is darker meat with a texture that is more like beef, so a rarer finish results in a more tender duck.
Considering the USDA’s recommendation of fully cooking duck breast, I recommend you use your best judgment and preference when deciding how to cook your duck.
Scoring duck breast helps render all the duck fat, making the skin ultra-crispy! If you score the duck, use a sharp knife and score the skin lightly.
I recommend doing this when the duck breast is cold out of the fridge so it’s easier to slice.
I prefer scoring the duck so that all the fat is rendered, but it will not affect the quality much if you choose not to. *I also think it's easier to score duck after having cooked duck breast once before. 🙂
Allow the duck breast to rest for a few minutes before slicing it against the grain into thin slices. This will help to ensure that the meat remains tender and juicy. You can also fan the slices on the plate for a beautiful presentation.
🍽️ More Impressive Dinner Recipes
- Grilled Lamb Breast - This rich and smokey lamb breast will have you savoring every bite.
- Pan-Seared Sword Fish - Experience this easy pan-seared swordfish's succulent and delicate taste.
- Grilled Lamb Chops - Sink your teeth into these tender, juicy grilled lamb chops, bursting with flavor from my homemade lamb rub.
- Pan-Seared Wagyu Ribeye Steak - This melt-in-your-mouth tender Wagyu ribeye is seared to perfection.
- Boiled Lobster - A whole juicy boiled lobster, ready to dip in butter.
- Sous Vide Ribeye Steak - Treat yourself to the ultimate steak experience with ultra-tender sous vide ribeye steak.
Do you love a recipe you tried? Please leave a 5-star 🌟rating in the recipe card below and/or a review in the comments section further down the page.
Stay in touch with me through social media @ Pinterest, Facebook, Instagram, or Twitter! Subscribe to the newsletter today (no spam, I promise)! Don't forget to tag me when you try one of my recipes!
📖 Recipe Card
Pan Seared Duck Breast
Ingredients
- 12 oz duck breast
- each, salt & pepper (to taste)
(Note: 2x or 3x only changes the ingredient list)
Instructions
- Rinse and pat your 12 oz duck breast(s) dry using paper towels. It is optional, but you can use a sharp knife to score the duck breast fat in a diamond pattern. Make sure not to cut so deep that you cut into the meat!
- Pick a skillet or frying pan that will have ample room for your duck portion. Season both sides of your prepared duck breast(s) generously then place the duck breast into skillet while it is still cold.
- Heat your skillet with the duck breast(s) over low heat for the first 3 minutes, then increase the heat to medium. Once the duck breast is sizzling and the fat is starting to fry off, leave the duck breast undisturbed with the fat side down to cook for an additional 6-8 minutes.
- Drain or spoon off the excess duck fat from your skillet.
Skillet Finish:
- To finish your duck breasts in the skillet, flip after the fat has fully been rendered and the skin is nice and crispy. Cook for an additional 2-4 minutes until your duck is done.
Oven Finish:
- To finish your duck breasts in the oven, either make sure that your skillet is oven-safe or preheat a clean-rimmed baking sheet to 400°F (205°C) while you start the duck breasts in your skillet. Transfer the duck breasts to your baking sheet with the skin side down and cook for an additional 4-6 minutes.
- Cook until your duck breast has an internal temperature of 130°F (54°C), then remove it from your skillet or oven and rest for 10 minutes before slicing and serving.
Notes
- When slicing up your duck breast(s) to serve, be sure not to cut the slices too thinly, as they will get cold quickly. I like to slice them about ½ inch thick or so.
- USDA recommends cooking duck until it reaches 165°F (74°C). However, this is overdone to many, myself included! Use your personal preference and best judgment to determine to what temperature you’d like your duck to be cooked.
- Save the excess duck fat you’ve drained! You can use this fat to fry up eggs, fried duck fat potatoes, or use it to make a quick pan gravy or sauce to serve over the duck.
- I recommend keeping it simple, but you can add your preferred seasonings to the duck breasts if desired. Try a sprinkle of garlic powder, onion powder, or fresh chopped herbs like rosemary!
Dave Pope says
Amazing duck recipe, I made a fresh orange sauce to go over it. Yummy!