
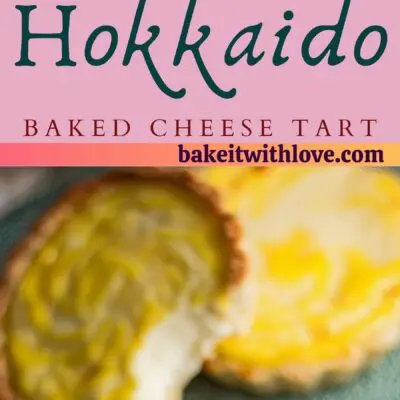
The fantastic Hokkaido Cheese Tart is a rich and creamy baked cheese tart. Combining mascarpone, cream cheese, and Parmesan cheese in the tangy custard filling. These tarts are so delicious and addictive that they sell at a rate of one per second worldwide, according to the Hokkaido website!
Jump to:
If you aren't fortunate enough to have been to one of the many Japanese or Asian locations of the Hokkaido-originated bakery shop, you're in luck. There are two locations here in the US now.
Of course, unless you happen to live near one of the California locations, or you're planning on traveling to San Francisco or LA sometime soon you'll still be missing out on these oh-so-tasty and tangy treats. That's where this easy tart recipe comes in handy.
Not sure if cheese equals dessert in your mind? I had my doubts, too. But my brother-in-law swore to me that they would knock my socks off and become a new obsession.
He was right, the vote is in and it's a solid 5 out of 5 in my home. Everyone enjoyed them and gave thumbs-up approval for the baked cheese tarts to become a staple recipe.
🤔 What Is A Hokkaido Cheese Tart
The Hokkaido baked cheese tart was made popular by a bakery in Sapporo, Hokkaido, Japan. The extra-special part comes in when you know that the Hokkaido region in Japan is known for its high-quality milk and dairy production.
This region is home to famous dairy farms and produces over 50% of Japan's milk and 90% of Japan's natural cheeses. The availability of these fresh, high-quality dairy products has given rise to specialty bakeries that produce sweets like these cheese tarts.
Sapporo city itself is called the 'Kingdom of Sweets'! Between the amazing confectionery treats available and the snow festivals offered in this Northern Japan region, it's a once-in-a-lifetime trip that I hope to make!
🥘 Ingredients
The custard filling is made with three kinds of cheese: butter, milk, egg, sugar, and a hint of lemon juice, which combine to make a dreamy tart filling.
Shortcrust Pastry
- Butter (unsalted, softened at room temperature)
- Sugar
- Egg Yolk
- Vanilla Extract (or vanilla paste or lemon extract)
- Lemon (zested & juiced - reserve the juice for the tart filling)
- All-purpose flour
Hokkaido Cheese Tart Filling
- Cream Cheese
- Mascarpone Cheese
- Parmesan Cheese (grated)
- Butter (unsalted)
- Milk (whole milk)
- Confectioners Sugar (sifted)
- Cornstarch (sifted)
- Vanilla Extract
- Lemon Juice (reserved from zested lemon for shortcrust pastry)
- Egg (beaten)
- Egg Yolk (beaten - reserved to top the tarts with)
🔪 How To Make Hokkaido Cheese Tarts
This recipe makes five 4.5-inch tarts.
Shortcrust Pastry
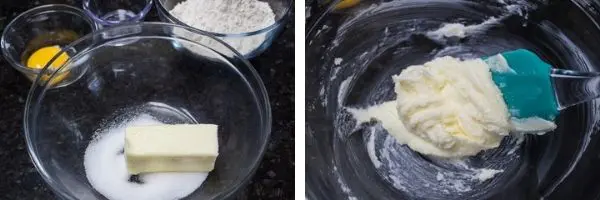
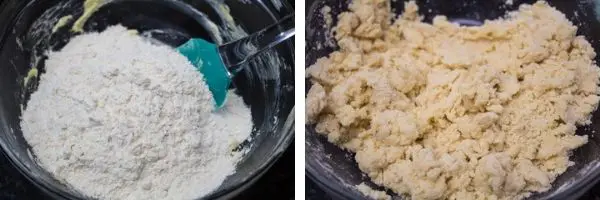

- In a medium to large-sized mixing bowl, lightly cream together ⅓ cup butter and 2 tablespoons sugar.
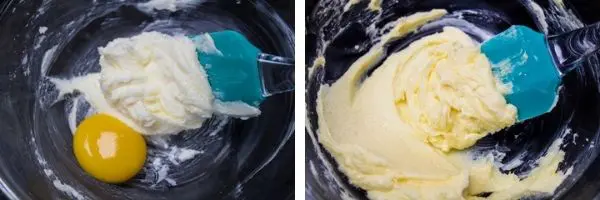
- Add the egg yolk, ½ teaspoon vanilla or lemon extract, and lemon zest and combine.
- Add 1 cup all-purpose flour and mix the pastry dough just enough to incorporate the flour into the wet ingredients.
- Gather the dough up and shape it into a disc. Wrap with cling film and refrigerate for an hour to chill.
Cheese Tart Filling
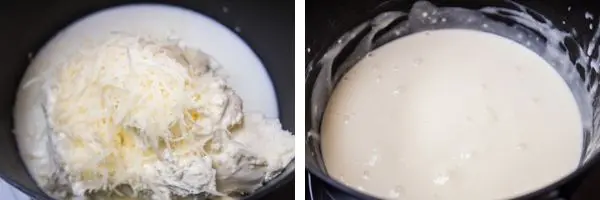

- Combine 7 tablespoons cream cheese, 7 tablespoons mascarpone cheese, ⅓ cup Parmesan cheese, ⅓ cup milk, and 2 tablespoons butter in a heavy-bottom saucepan. Heat the mixture over medium-low temperature and stir until melted.
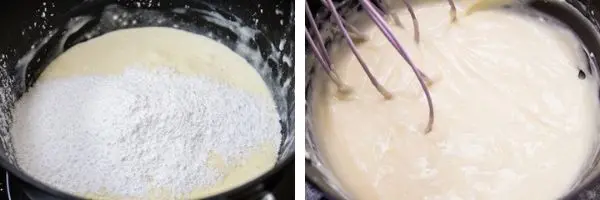
- Sift ¼ cup confectioners' sugar and 1 tablespoon cornstarch, then add them into the cheese mixture. Whisk into the cheeses until smooth.
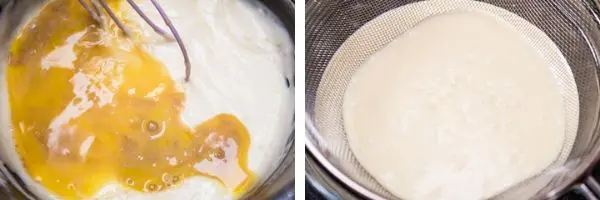
- Add the egg, ½ teaspoon vanilla extract, and 2 tablespoons lemon juice and mix them in thoroughly. Once the mixture thickens, remove from heat and pour through a fine-mesh sieve into a clean bowl.
- Cover the sieved cheese filling with plastic cling film that is allowed to fall into the bowl and press down onto the surface of the filling. Set aside until completely cooled.
Assemble the Hokkaido Cheese Tarts
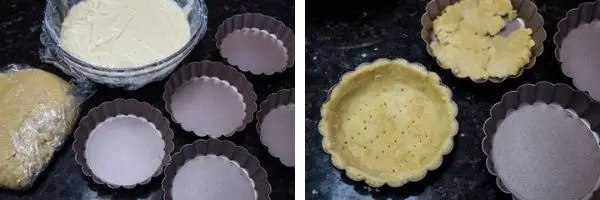
- Fill the tart pans by pressing the dough into each pan to make an even layer across the base of the tart pan and up the sides. Trim away excess dough for clean tart edges, then 'dock' the pastry dough by poking several times with a fork.
- Blind bake the pastry shells on a baking sheet in the oven at 350°F (175°C) for 8-10 minutes or until a light golden color. Allow the baked tart shells to cool before filling. Once cooled, remove the shells from the tart pans.
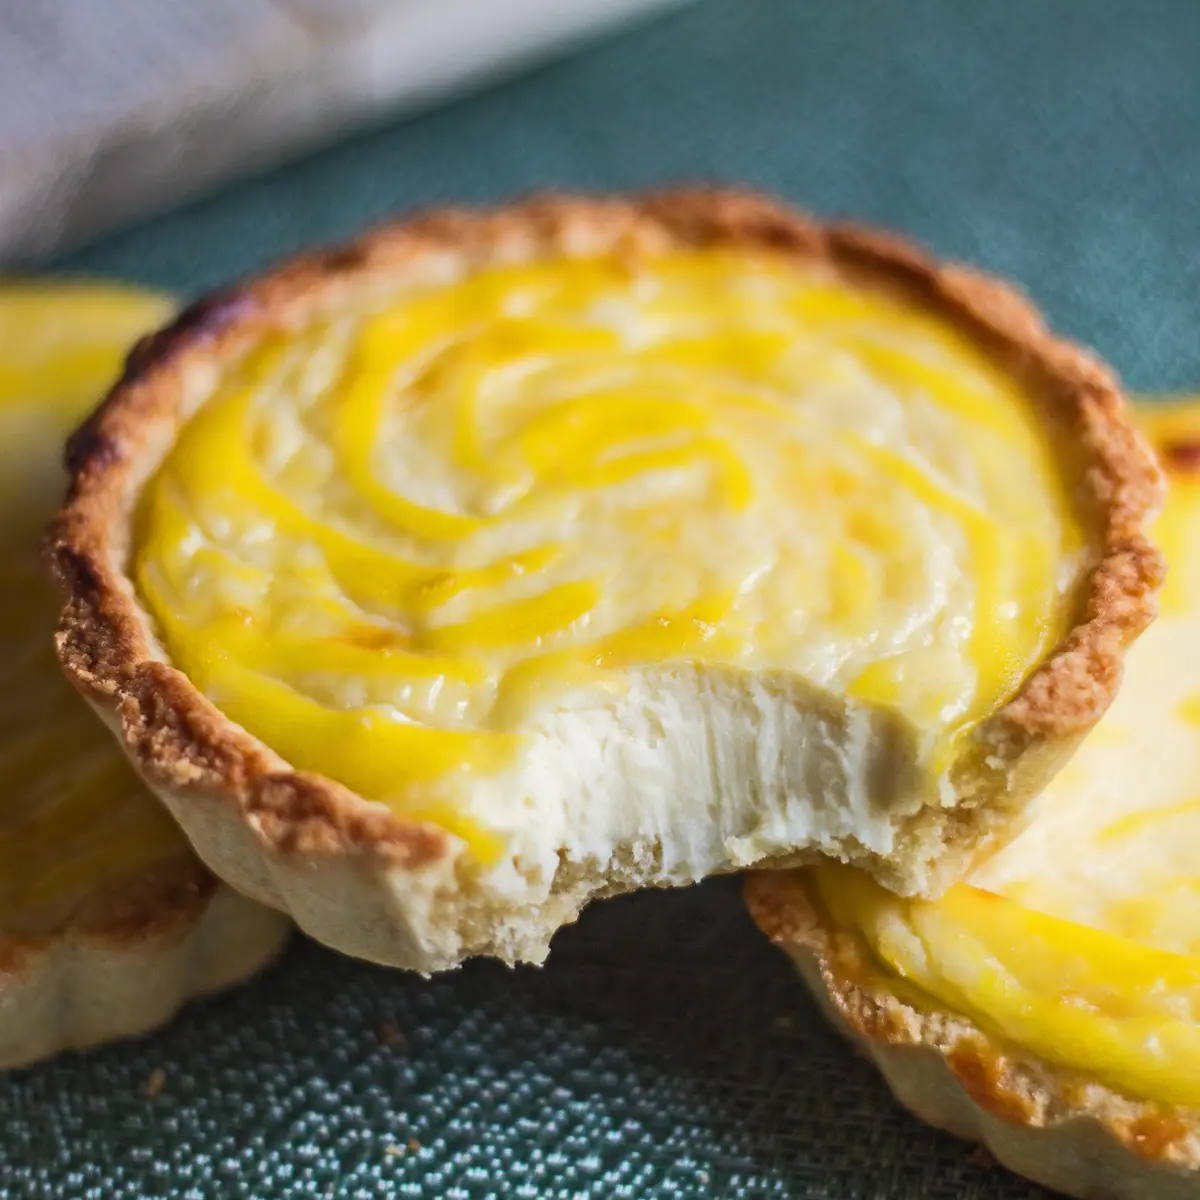
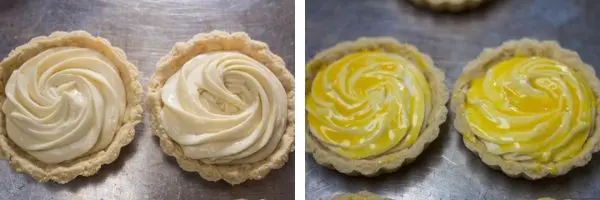
- Fill each tart with cheese custard filling to just under the edge of the tart shell. Brush the top of each tart with egg yolk.
- Preheat your oven to 425°F (218°C).
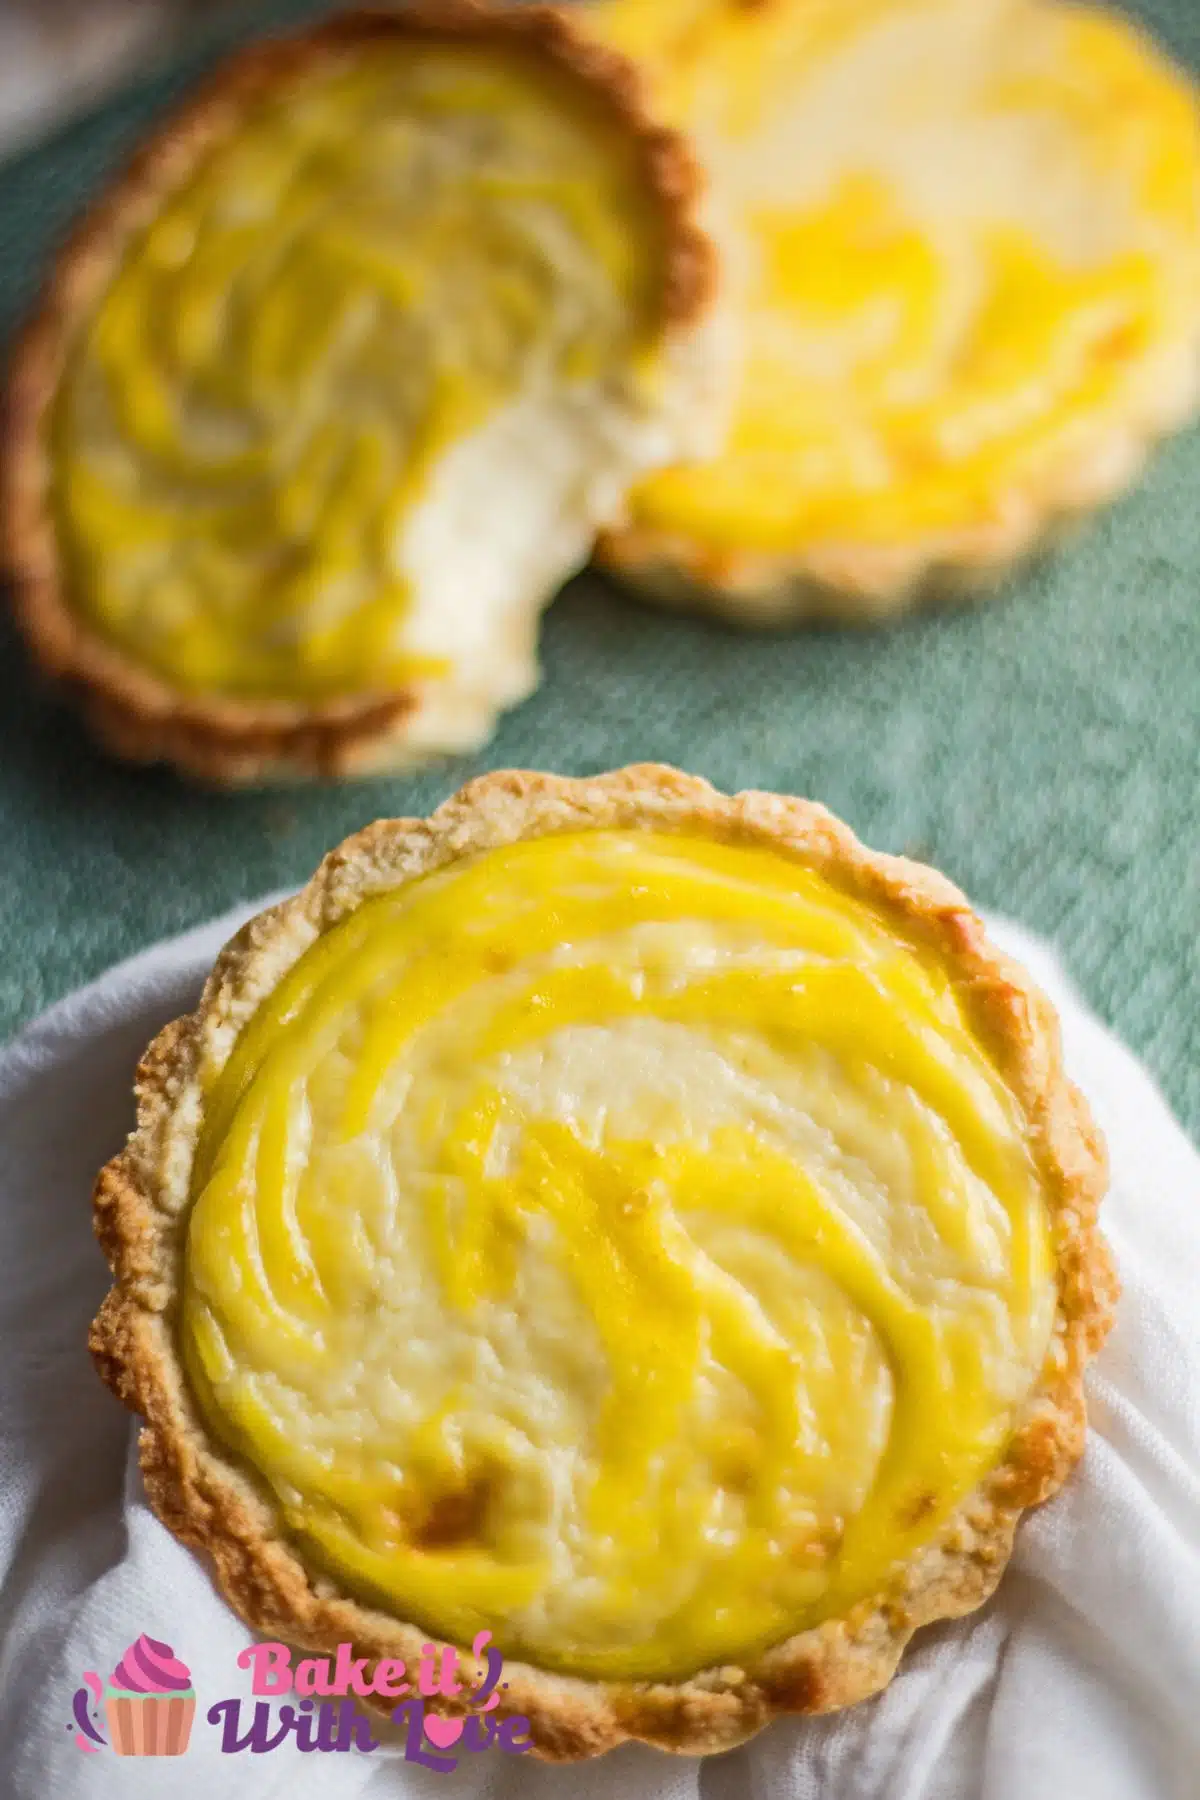
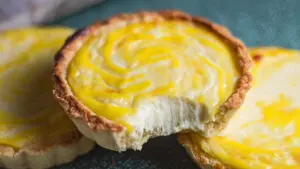
- Bake in the center of the middle rack in your preheated oven at 425°F (218°C) for 5-6 minutes, or until the custard filling begins turning golden brown. Remove from the oven and allow to cool on the baking sheet.
- The Hokkaido cheese tarts can be served while still warm, but not hot. Otherwise, cool the tarts completely and store refrigerated in an airtight container.
💭 Angela's Pro Tips & Recipe Notes
- Chill the Dough: After preparing your shortcrust pastry dough, ensure it's properly chilled. This helps with handling and prevents the dough from shrinking during baking.
- Cream Cheese Mixture: For the filling, thoroughly combine the cream cheese, mascarpone, and Parmesan cheese with milk and butter over medium-low heat until smoothly melted. This blend of cheeses is key to achieving the rich, creamy texture characteristic of Hokkaido cheese tarts.
- Sift for Smoothness: Sift the confectioners' sugar and cornstarch before adding them to the cheese mixture. This step is crucial for a lump-free, silky filling.
- Strain the Filling: After cooking, strain the cheese filling through a fine-mesh sieve. This extra step ensures the filling is perfectly smooth, enhancing the luxurious texture of the tarts.
- Prevent Skin Formation: Cover the surface of the cheese filling directly with cling film while it cools to prevent a skin from forming. This keeps the filling smooth and ready for the tart shells.
- Egg Wash for Shine: Brush the top of your filled tarts with a beaten egg yolk before baking for a glossy, golden finish.
- Baking Temperature and Time: Pay close attention to the baking temperature and time recommended in the recipe. Precise baking ensures the tarts have a golden crust and a creamy center without overcooking.
- Storage: If you have leftovers, store them in an airtight container in the refrigerator. Gently reheat in the oven or microwave before serving to recapture the freshly baked taste and texture.
🥧 More Great Tart Recipes
- Blackberry Tart
- Pasta Frola
- Pear and Pistachio Tart
- Sweet Potato Tart
- French Strawberry Tart
- French Fruit Tart
Do you love a recipe you tried? Please leave a 5-star 🌟rating in the recipe card below and/or a review in the comments section further down the page.
Stay in touch with me through social media @ Pinterest, Facebook, Instagram, or Twitter! Subscribe to the newsletter today (no spam, I promise)! Don't forget to tag me when you try one of my recipes!
📖 Recipe Card
Hokkaido Cheese Tart
Ingredients
Shortcrust Pastry
- ⅓ cup butter (unsalted, softened at room temperature - 5 ⅓ tablespoons)
- 2 tablespoon sugar
- 1 large egg yolk
- ½ teaspoon vanilla extract (or vanilla paste, or lemon extract)
- lemon (zested & juiced - reserve the juice for the tart filling)
- 1 cup all-purpose flour
Hokkaido Cheese Tart Filling
- 7 tablespoon cream cheese
- 7 tablespoon mascarpone cheese
- ⅓ cup Parmesan cheese (grated)
- 2 tablespoon butter (unsalted)
- ⅓ cup milk (whole milk)
- ¼ cup confectioners sugar (sifted)
- 1 tablespoon cornstarch (sifted)
- ½ teaspoon vanilla extract
- 2 tablespoon lemon juice (reserved from zested lemon for shortcrust pastry)
- 1 large egg (beaten)
- 1 large egg yolk (beaten - reserved to top the tarts with)
(Note: 2x or 3x only changes the ingredient list)
Instructions
Shortcrust Pastry
- In a medium to large-sized mixing bowl, lightly cream together the ⅓ cup butter and 2 tablespoon sugar.
- Add the 1 large egg yolk, ½ teaspoon vanilla extract or lemon extract, and lemon zest and combine.
- Add 1 cup of 1 cup all-purpose flour and mix the pastry dough just enough to incorporate the flour into the wet ingredients.
- Gather the dough up and shape it into a disc. Wrap with cling film and refrigerate for an hour to chill.
Hokkaido Cheese Tart Filling
- Combine the 7 tablespoon cream cheese, 7 tablespoon mascarpone cheese, ⅓ cup Parmesan cheese, ⅓ cup milk, and 2 tablespoon butter in a heavy-bottom saucepan. Heat the mixture over medium-low temperature and stir until melted.
- Sift the ¼ cup confectioners sugar and 1 tablespoon cornstarch, then add them into the cheese mixture. Whisk into the cheeses until smooth.
- Add the 1 large egg, ½ teaspoon vanilla extract, and 2 tablespoon lemon juice and mix them in thoroughly. Once the mixture thickens, remove from heat and pour through a fine-mesh sieve into a clean bowl.
- Cover the sieved cheese filling with plastic cling film that is allowed to fall into the bowl and pressed down onto the surface of the filling. Set aside until completely cooled.
Assemble the Hokkaido Cheese Tarts
- Fill the tart pans by pressing the dough into each pan to make an even layer across the base of the tart pan and up the sides. Trim away excess dough for clean tart edges, then 'dock' the pastry dough by poking several times with a fork.
- Blind bake the pastry shells on a baking sheet in the oven at 350°F (175°C) for 8-10 minutes or until a light golden color. Allow the baked tart shells to cool before filling. Once cooled, remove the shells from the tart pans.
- Fill each tart with cheese custard filling to just under the edge of the tart shell. Brush the top of each tart with 1 large egg yolk.
- Preheat your oven to 425°F (218℃).
- Bake in the center of the middle rack in your preheated oven at 425°F (218℃) for 5-6 minutes or until the custard filling begins turning golden brown. Remove from the oven and allow to cool on the baking sheet.
- The Hokkaido cheese tarts can be served while still warm, but not hot. Otherwise, cool the tarts completely and store refrigerated in an airtight container.
Amanda Tan Jieyu says
Can I Have Two Hokkiado Japanese Baked Cheese Tarts.