• Skip to primary navigation
  • Skip to main content
  • Skip to primary sidebar
  • Skip to footer
  • Recipes
    • Dinners
    • Breakfast
    • Side Dishes
    • Desserts
  • Game Day Appetizers
  • Valentine's Day
  • About
    • Contact Us
  • Subscribe

Bake It With Love

menu icon
go to homepage
  • Recipes
    • Dinners
    • Breakfast
    • Side Dishes
    • Desserts
  • Game Day Appetizers
  • Valentine's Day
  • About
    • Contact Us
  • Subscribe
  • Join Us!

    • Facebook
    • Instagram
    • Pinterest
    • Twitter
    • YouTube
  • subscribe
    search icon
    Homepage link
    • Recipes
      • Dinners
      • Breakfast
      • Side Dishes
      • Desserts
    • Game Day Appetizers
    • Valentine's Day
    • About
      • Contact Us
    • Subscribe
  • Join Us!

    • Facebook
    • Instagram
    • Pinterest
    • Twitter
    • YouTube
  • ×

    Home » Recipes » Cake Recipes

    Angela @ BakeItWithLove.com · Leave a Comment

    Rainbow Lollipop Drip Cake

    Jump to Recipe

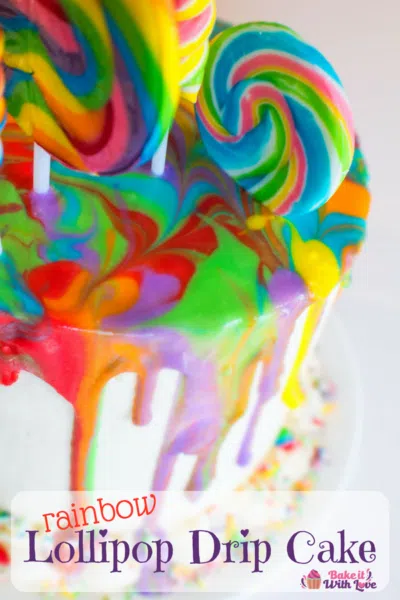
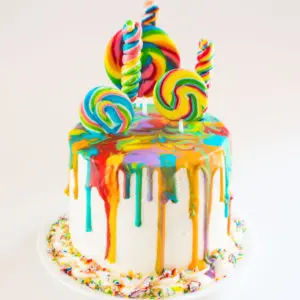
    When it comes to bright and colorful this Rainbow Lollipop Drip Cake is at the top of our list for super fun cakes to make for any occasion! This fantastic cake is so fun to make and looks so amazing, yet it is easy enough for anyone to DIY at home!

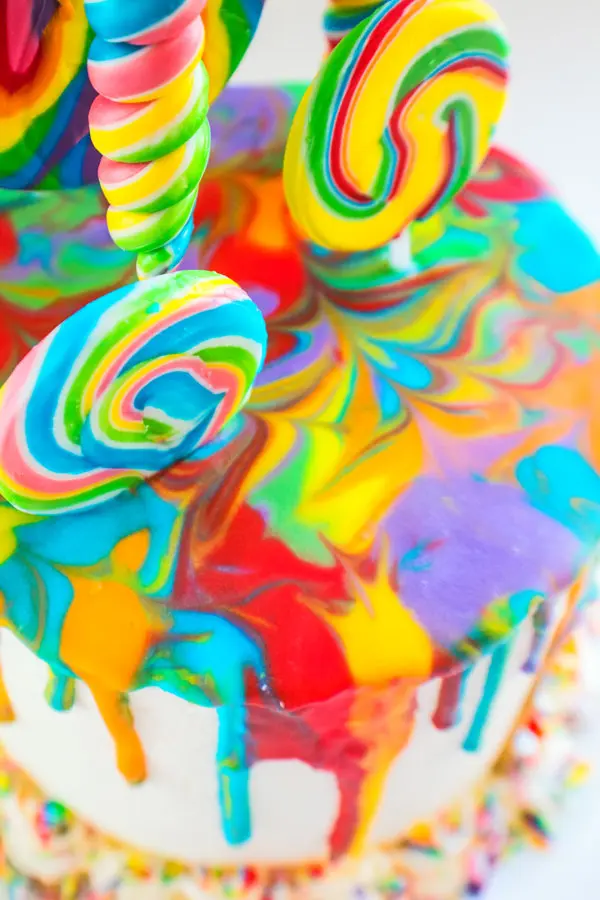
    Change up your colors if you like, but we love the vibrant rainbow royal icing dripping off the edges of our candy-topped drip cake!

    Rainbow Lollipop Drip Cake

    Stack this rainbow lollipop drip cake as high as you like using your favorite cake recipe!

    Our rainbow drip cake consists of four six inch round white cakes layered with vanilla buttercream frosting as the filling and as the smoothed icing on the entire cake. We piped a bottom border of buttercream as well, then sprinkled it with crushed lollipops. Once these basics are done, you're ready to make your royal icing and create your own spectacular drip cake!

    Easy to make and super fun Rainbow Lollipop Drip Cake is fun for all ages and occasions!

    We made our royal icing batch using meringue powder (the alternate listed below in the recipe), then divided the icing into six batches that were separated into small ziploc bags. To ensure that we didn't change the consistency of the royal icing, we used gel food coloring to color our divided royal icing portions.

    Snip the edges of your ziploc bags after coloring the royal icing, then start adding the colors to the center of the top of the cake. Work your way toward the edges, then combine the colors by running a toothpick through the royal icing (see video below). When you are using your toothpick, replace with a clean one as necessary to keep the colors just combined (but not muddied together).

    Top your cake off with your favorite assortment of rainbow lollipops and allow the royal icing to dry, as it will set in place in about 12 hours. Enjoy!

    Watch Rainbow Lollipop Drip Cake on my Bake It With Love YouTube Channel


    Rainbow Lollipop Drip Cake

    Rainbow Lollipop Drip Cake, 6 inch round 4 layer vanilla cake with royal icing drip and rainbow lollipops
    Print Recipe Leave A Comment
    Love This Recipe?Click On A Star To Rate It!
    5 from 5 reviews

    Rainbow Lollipop Drip Cake

    Fun and bright and perfect for any occasion, this Rainbow Lollipop Drip Cake is a kid-favorite!
    Author | Angela
    Servings: 12 servings (makes 1 4 layer 6" cake)
    Calories: 123kcal
    Prep 35 minutes
    Cooking 25 minutes
    Total Time 1 hour
    Pin Recipe Share on Facebook

    Ingredients
     

    • 1 white cake recipe (or 1 boxed cake mix)
    • 2 vanilla buttercream frosting recipe

    Royal Icing for Drip Cakes

    • 1 large egg white
    • lemon juice (from ½ large lemon)
    • 2 cups confectioners sugar
    • 2 tablespoon milk
    • 6 gel food colors

    Instructions

    Assembling the Rainbow Lollipop Drip Cake

    • You can stack your cake as high as you like, but we baked 4 - 6 inch rounds and filled the layers with vanilla buttercream frosting. We then applied a thin crumb coat to the layered cake (used to prevent crumbs from showing through your frosting) and refrigerated the layered and coated cake for about 30 minutes, or until you are ready to move onto the next step.
    • Frost your cake with another batch of vanilla buttercream frosting, smoothing the frosting on all sides and making the top of the cake as smooth and level as possible. Apply a bottom border of piped buttercream frosting (if desired) and sprinkle crushed lollipop candy on the bottom border.

    Royal Icing for Drip Cakes

    • *You can also use meringue powder instead of egg white with lemon (we use 2 teaspoon meringue powder + 2 tablespoon water).
    • Beat the egg white (or meringue powder with water) with the whisk attachment of your stand mixer or using a hand mixer until foamy. Start on slow speed when mixing the powder until it is combined with the water, then increase the speed to medium-high.
    • Add lemon juice and mix briefly, then add the confectioners sugar and mix at a slow setting until combined. Drizzle the milk in, adding small amounts until you have the desired consistency for your royal icing.
    • The royal icing should cling to your spoon and slowly run off, not pour off quickly, so that the drip effect will work correctly.

    Apply Royal Icing for Drip Cake Effect

    • Divide your batch of royal icing into 6 equal portions, placing each portion into a separate ziploc bag. Add desired gel food coloring to each bag (gel food coloring will not change the consistency of your royal icing, the drops of food coloring can make your icing more runny).
    • Move the royal icing and food coloring around in the bag until well combined, repeat with each color.
    • Snip a small corner off of each of your bags of royal icing and start applying the icing at the center of the cake, randomly placing the colors on the top of the cake. Work outward toward the cake edge until you have enough royal icing on the top of the cake to start combining the colors and push your icing toward the edges to begin the 'drip' effect.
    • Use a toothpick to combine the royal icing colors, you can swirl your colors together or drag the toothpick in opposite directions. Either way, work your royal icing toward the top edge of the cake to allow it to slowly drip down the sides. Replace your toothpick(s) as needed to keep your colors clean when combining.
    • Once you have your colors combined and your drip effect started down the sides of your cake, top your cake with rainbow lollipops and then allow the royal icing to set in place (about 12 hours).

    Video

    Nutrition

    Calories: 123kcal (6%) | Carbohydrates: 24g (8%) | Fat: 2g (3%) | Saturated Fat: 1g (6%) | Cholesterol: 7mg (2%) | Sodium: 39mg (2%) | Potassium: 24mg (1%) | Sugar: 22g (24%) | Vitamin A: 90IU (2%) | Vitamin C: 1.2mg (1%) | Calcium: 11mg (1%)
    Did you try this recipe? Rate it below!I can’t wait to see your results! Mention @bake_it_with_love or tag #bake_it_with_love!
    drip cake, lollipop cake, rainbow cake, rainbow lollipop drip cake
    Course Cake Recipes, Dessert, Dessert Recipes, Frosting, Icing
    Cuisine American


    author profile photo
    Angela @ BakeItWithLove.com

    Angela is an at home chef that developed a passion for all things cooking and baking at a young age in her Grandma's kitchen. After many years in the food service industry, she now enjoys sharing all of her family favorite recipes and creating tasty dinner and amazing dessert recipes here at Bake It With Love!

    bakeitwithlove.com/about/
    « Homemade Marshmallow Fondant
    Lobster Chowder »

    Share This Recipe!

    • Share
    • Twitter
    • Yummly
    • Print

    Reader Interactions

    Thanks for coming! Let me know what you think: Cancel reply

    Your email address will not be published. Required fields are marked *

    Recipe Rating


    This site uses Akismet to reduce spam. Learn how your comment data is processed.

    Primary Sidebar

    • Facebook
    • Instagram
    • Pinterest
    • Twitter
    • YouTube
    Author bio photo with cake.

    Hi there, I'm Angela! I am an avid vintage cookbook collector, recipe creator, animal lover, and total foodie. I love sharing recipes that are new, fun, and creative as well as great classic recipes just like my Grandma used to make!

    More about me →

    Game Day Appetizers

    • Southern Corn Fritters
    • Boneless Chicken Wings
    • Buffalo Shrimp
    • Mild Buffalo Sauce
    • Traditional Easter Dinner Menu
    • Salad Recipes
    • Winter Potluck Recipes
    • Dill Pickle Dip

    Valentine's Day

    • Red Velvet Valentine's Day Treats
    • Red Velvet Blossoms
    • Red Velvet Crinkle Cookies
    • Heart Shaped Dessert Ideas For Valentine's Day
    • Strawberry Dump Cake
    • Valentine's Day Desserts
    • Chocolate Valentine's Day Desserts
    • Family Dinner Ideas For Valentine's Day
    As seen on image block.

    DISCLAIMER: As an Amazon Associate, I earn a commission from qualifying purchases at no added cost to you.

    CroatianCzechDanishDutchEnglishFrenchGermanItalianJapaneseMalayPortugueseRussianSwedishTurkish

    Footer

    ↑ back to top

    About

    • About Angela
    • Privacy Policy
    • Work With Me
    • Contact
    • FAQ
    • Home
    • Accessibility Statement

    Recipes

    • Dinners
    • Desserts
    • Side Dishes
    • Breakfasts
    • Appetizers
    • Condiments
    • Air Fryer
    • Slow Cooker
    • Instant Pot

    Read

    • Collections
    • Baking Basics
    • Conversions
    • Food That Starts With
    • Substitutions
    • Food Info
    • Web Stories

    Copyright © 2022 Bake It With Love