
When it is time to get cake out of a bundt pan but things aren't going to plan, try these useful tips and tricks! If you're here because you already baked your dessert and your cake seems stuck, don't worry. You still have a few options to get your cake out of a bundt pan in one piece!
How To Get Cake Out Of A Bundt Pan
Bundt cakes are one of those desserts that are fun and frustrating. The unique shape automatically elevates any cake. It takes very little work to make a bundt cake look beautiful – if it comes out of the pan as planned.
However, the frustrating thing about bundt cakes is that they can be one of the most difficult cakes to get out of the pan. With a few tricks though, you can get your bundt cakes to come out of the pan easily, beautifully, and all in one piece every time!

Jump to:
- How To Get Cake Out Of A Bundt Pan
- The Best Way to Get a Bundt Cake Out A Pan in One Piece
- 1. Use a Non-Stick Pan
- What are the Best Non-Stick Pans?
- 2. Grease the Pan
- How To Grease Your Pan
- 3. Flour the Pan
- How to Flour a Cake Pan
- 4. Allow the Cake to Cool
- If The Cakes Still Sticks
- 5. Let Gravity Do The Work
- 6. Give It A Bang!
- 7. Steam It!
- 8. Loosen It Up
- How To Fix A Broken Bundt Cake
- 9. Fix it with Icing
- 10. Make It Into A Layered Dessert!
- 📖 Recipe Card
- 💬 Reviews
The Best Way to Get a Bundt Cake Out A Pan in One Piece
When trying to get a bundt cake out of the pan the best option is to plan ahead. If you have had a mishap with a bundt cake in the past, then you know how tricky they can be.
So, to help you avoid needing any extra tricks to get the cake out – follow the steps below before you even bake your cake.
Unfortunately, if you already have a baked cake today - then these first four steps won’t work this time around. Not to worry though! Simply jump to the next section for more ideas on how to get your cake out.
Moreover, if you have a tricky cake that doesn’t come out all in one piece – you can still salvage it. Check out my tips for 'How to Fix a Broken Bundt Cake'. Then, remember to start with these first four steps in the future.
1. Use a Non-Stick Pan
Always start with a non-stick pan when you can. Non-stick technology really works. It makes the final steps in the baking process much more enjoyable.
If you make Bundt cakes frequently then a good non-stick bundt pan is worth the investment. These pans are often only a few more dollars than a regular pan. They are worth every extra dollar.
Even if you only make a few cakes a year for special occasions, you’ll be happy you got the non-stick option. Not having to stress over a cake that won’t turn out when you are trying to get ready for a celebration is well worth the money.
What are the Best Non-Stick Pans?
When choosing a non-stick pan look for ones that are lighter in color. Sometimes darker colored pans can brown a cake. Since many bundt cakes are covered in glaze or icing (rather than frosting) the burnt coloring can be less than desirable.
In addition, always keep an eye out for when your pan needs to be replaced. Non-stick pans do have a shelf-life. If you notice areas where the non-stick coating has disappeared, it may be time for a new pan.
2. Grease the Pan
Whether you have a non-stick pan or a regular pan, you need to grease it! Yes, even if it is non-stick. Greasing the non-stick pan acts as a double non-stick layer and makes it even easier to pop your baked cakes out.
If you don’t have a non-stick pan, then you MUST grease it.
There are a few different ways you can grease the bundt Pan. Regardless of which method you choose, the most important thing is to get all the little nooks and crannies greased.
How To Grease Your Pan
Cooking spray is easy to get in all the crevices of the pan. Simply hold the pan and spray the bottom and all around the sides. Baking spray is even better (it has the cooking oil and flour combined for you).
Another method is to use a pastry brush. A pastry brush is an excellent choice if you prefer to use oil to grease your pan. Dip the pastry brush in the oil and then brush the inside of the pan. Make sure to get the bottom, the sides, and all the little crevices.
If you want to use oil, but don’t have a pastry brush, use a paper towel. Fold a paper towel in half and dip a corner into the oil. Follow the same method of coating the inside of the pan as you would with the pastry brush.
The reason bundt cakes stick easily is due to all the little crevices. So, again, be mindful that you get every little section greased.
3. Flour the Pan
To me, greasing and flouring your bundt pan is essential. A must-do combo for any bundt cake baking!
If you are not familiar with flouring your baking pans, this may be the step that changes everything. Sometimes greasing a pan doesn’t always do its job because the grease moves.
Whether you use cooking spray, oil, or butter when it gets heated it slides around in the pan. Therefore, you often end up with sections that stay greased more than others. The less greased areas are where the cake sticks.
When you add flour to the grease it adds another layer for the cake to adhere to while baking. Not only does the flour help the cake have something to grip but it also helps the cake rise evenly.
How to Flour a Cake Pan
Once you have greased the bundt pan, sprinkle a little bit of flour into the pan. Hold the pan by the sides and roll the pan around so that the flour evenly coats the inside of the pan.
Don’t forget the center tube! The center tube of the pan is often the area that gets forgotten when greasing and flouring. Make sure to grease and flour this section.
If you don’t have enough flour to cover the entire pan, then add more. Once you have a light flour coating around the entire pan, tip the pan over and shake out the excess flour.
Tap the bottom of the pan to help shake out all the extra flour. You only want a light coating. *I do this step over the trash can! 🙂
4. Allow the Cake to Cool
It can be tempting to try and release the cake right when it comes out of the oven. However, giving it time to cool will help you get the cake out more easily.
When you remove the cake from the oven let it cool for 10-15 minutes. Ideally, set it on a wire rack so that it can cool quickly and evenly.
If you don’t’ have a wire rack you can set the cake on a hot pad or let it sit on top of the stove. Just make sure to turn the oven off.
While you don’t want the cake to be hot, you also don’t want it to cool completely. Trying to turn it while it is too hot can make it break. However, trying to turn it when it has completely cooled can lead to it sticking.
Let the cake cool until it is warm to the touch. Then use two hot pads to hold the outside of the pan, set a plate or rack over the bundt pan, and flip to invert the cake onto your plate.
If The Cakes Still Sticks
If you follow all the steps above and the cake still sticks, not to worry! There is hope! Try these ideas below to get your cake out in one piece. If it ends up coming out in more than one piece, read to the bottom for ideas to fix it.
5. Let Gravity Do The Work
The first thing to do is just give it some time. If the cake doesn’t release right when you turn it, let it sit. Sometimes all it needs is a little pull from gravity.
You can give it a little extra push by gently wiggling the cake pan. Then let it sit inverted on the plate for about 10 minutes to see if it releases on its own.
6. Give It A Bang!
If a little bit of a wiggle doesn’t seem to be enough, give the pan a little bit of a bang. While the cake is inverted, use a wooden spoon to tap on the pan.
Tap on the bottom and all around the sides. Start to slowly lift the pan to see if it has been released.
7. Steam It!
If you can tell that your cake is really in there good, then you may want to start with steaming it. When you take the cake out of the oven let it sit on top of the stove.
Take a clean dish towel and soak it in hot water. Wring it out so that it is moist, but not wet. If you want it to be extra hot, you can place the towel on a plate in the microwave for 1 minute to get it extra hot.
Be careful when handling the steaming towel!
Carefully place the towel over the top of the cake. Let it sit until the cake pan has cooled. Remove the towel and invert.
8. Loosen It Up
After steaming the cake and before the other two options you can help loosen up the cake with a spatula. Run a rubber spatula along the edges of the cake to release them from the pan. Then invert.
How To Fix A Broken Bundt Cake
Even with all the right tools, there will be times when a cake does not release in one piece. It has happened to the best of us! This can be a result of a different recipe, a change in altitude, or a combination of things.
While it may not look exactly like you wanted, it most likely still tastes delicious. So, don’t toss it. Simply change how you serve it.
9. Fix it with Icing
Icing, frosting, glaze – all of these can work magic when piecing together a cake. If you have a few small (or large) pieces that need to be attached, use the icing to do so.
You can also add extra icing over the top of the cake to cover little patches that were fixed.
10. Make It Into A Layered Dessert!
If your cake crumbles beyond repair, then turn it into a new dessert. Make a layered dessert with your favorite fruit and cream. Crumbled cake makes a yummy strawberry shortcake, a divine strawberry lush, or tasty fruit parfait!
You can also add it as a topping on ice cream or add ice cream on top of the crumbled cake! Go ahead and get creative. Then, next time give it another go.
With these tips and tricks, you will be a master at getting cake out of a bundt pan! Tell us what kind of bundt cake recipe you are baking in the comments below!
Do you love a recipe you tried? Please leave a 5-star 🌟rating in the recipe card below and/or a review in the comments section further down the page.
Stay in touch with me through social media @ Pinterest, Facebook, Instagram, or Twitter! Subscribe to the newsletter today (no spam, I promise)! Don't forget to tag me when you try one of my recipes!
📖 Recipe Card
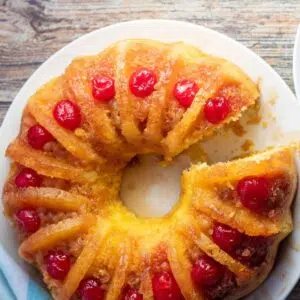
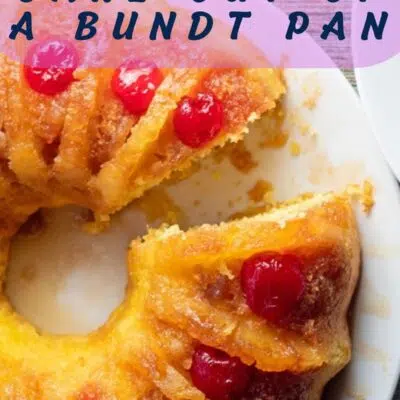
How To Get Cake Out Of A Bundt Pan: Pineapple Upside Down Bundt Cake
Ingredients
- ½ cup butter (divided into 2 equal portions of ¼ cup melted butter)
- 1 cup light brown sugar (packed)
- 20 oz pineapple slices (drained, reserve the juice, cut slices in half)
- 20 maraschino cherries (stems removed)
- 15 oz yellow cake mix
- 3 large eggs (room temperature)
- water (enough to total 1 cup with pineapple juice)
Instructions
- Preheat your oven to 350°F (175°C) and coat your bundt pan with butter and flour.
- Pour the first ¼ cup portion of melted butter into your bundt pan then sprinkle the brown sugar over the melted butter. Spread evenly over the bottom of your bundt pan.
- Arrange the halved pineapple slices in the bottom of your bundt pan nestled into the ridges, then place a maraschino cherry between the slices. Push gently on the cherries to firmly place them in the brown sugar.
- Combine the reserved pineapple juice with enough water to make 1 total cup of liquid. Mix the cake batter as directed on the box using the second ¼ cup of melted butter, the pineapple juice with water, and the eggs.
- Pour the mixed batter into your bundt pan gently so that the pineapple slices remain upright, do not spread.
- Bake at 350°F (175°C) for 30-35 minutes, or until an inserted cake tester, toothpick, or butter knife comes out clean. A fully baked cake should spring back to the touch.
- Place a plate or serving platter over the bottom of the bundt pan and invert the cake, then set aside for 5 minutes to allow the cake to release from the pan.
- Remove the bundt pan and continue cooling for 25 minutes, then serve warm or store for later.
Notes
- Bake at 325°F (163°C) for dark or non-stick pans.
- You can also bake the cake in 2 8-inch or 9-inch rounds for 22-27 minutes.
- Bake in a 9x13 pan for 21-26 minutes.
CLM overbey says
I'M curious as to how the pineapple stays. standing up in place while adding the cake mix?
Angela Latimer says
It's set into the ridges of the pan. If you have wider ridges in your bundt pan, you can set two halved slices together to hold each other up.
Darla B says
This turned out beautiful. Baked it a little longer than stated, but was easy to make.