

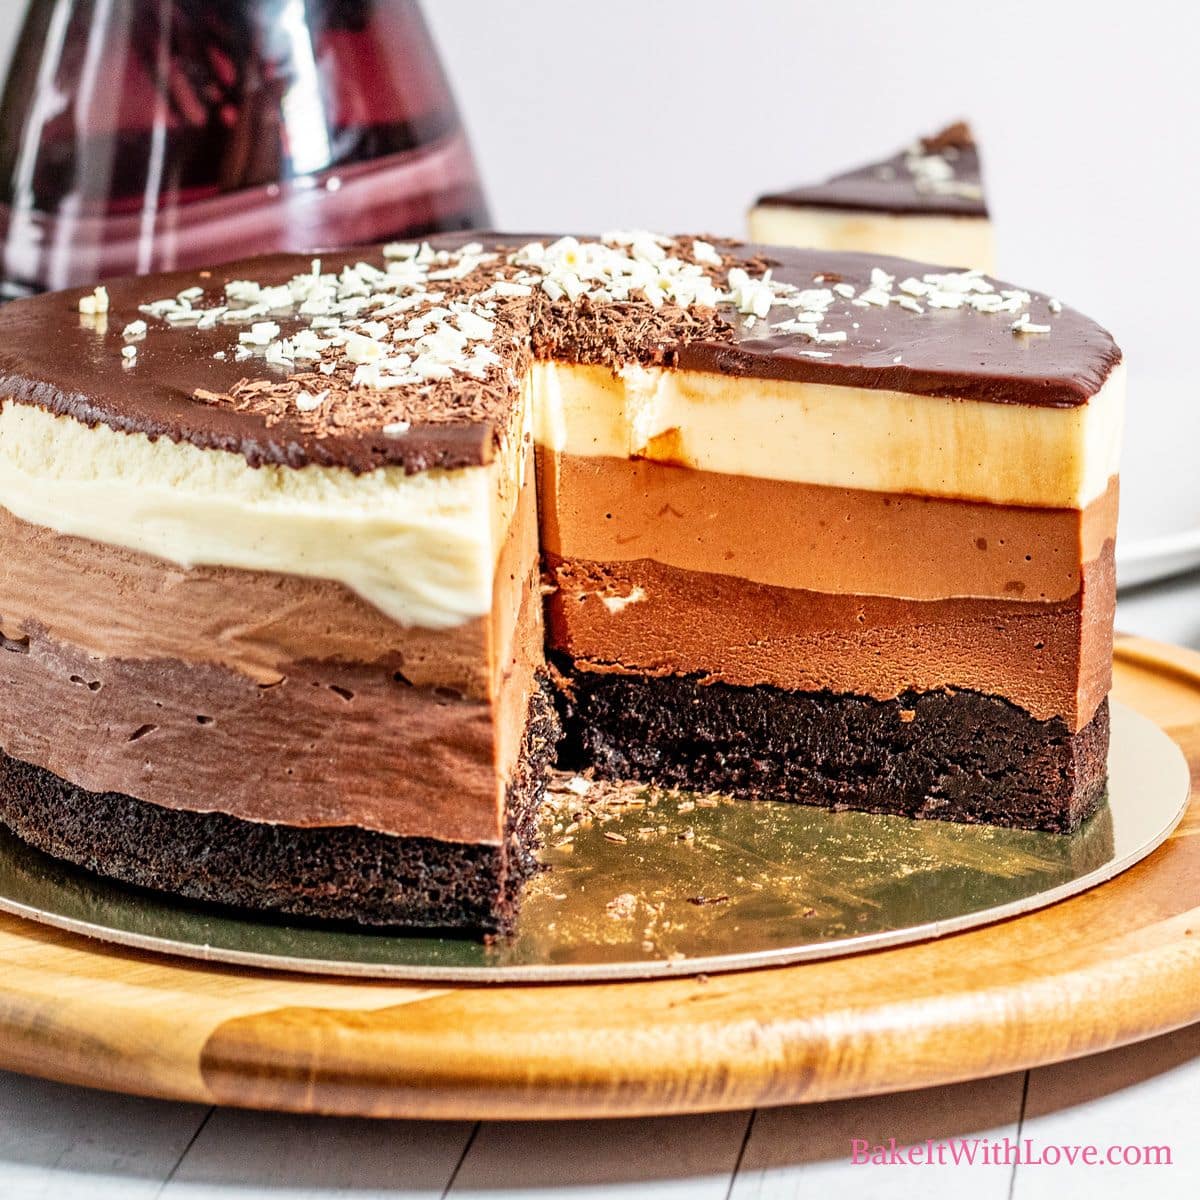
My impressive layered chocolate mousse cake recipe begins with a rich, fudgy brownie base for the ultimate chocolate experience. Each distinct layer of dark, milk, and white chocolate mousse adds a creamy and decadent texture that is simply unforgettable. Get the detailed, step-by-step instructions to create this stunning dessert that's perfect for any special occasion.
Jump to:
- 🥘 Ingredients
- 👩🏻🍳 How To Make A Layered Chocolate Mousse Cake
- 🌟 Pro Tip: Heating Cream
- 🌟 Pro Tip: Temperature Is Key
- 🌟 Pro Tip: Stabilizing The Mousse
- 🌟 Pro Tip: Whipping Cream
- 🌟 Pro Tip: Folding Technique
- 🌟 Pro Tip: Smooth Ganache
- 💭 Angela's Pro Tips & Recipe Notes
- 🥡 Storing
- ❔ Do I Have To Use Gelatin In The Mousse Layers
- 📖 Recipe Card
- 💬 Comments & Reviews
My husband has been requesting a mousse cake for years and I finally built this decadent chocolate cake that did not disappoint. What a fantastic birthday cake!
Start with my homemade chocolate cake mix for more tasty sweets, then make a satisfying chocolate birthday cake or easy chocolate cake for last-minute treats.
We're debating between Devil's Food or German Chocolate for my chocoholic this year - which would you choose?
🥘 Ingredients

- Sugar - Regular granulated sugar adds sweetness and helps keep the brownie crumb tender. It's also used in each mousse layer.
- Light Brown Sugar - Adds moisture and a touch of molasses flavor for a richer brownie base.
- Butter - Gives the brownies richness and helps create a dense, fudgy texture.
- Coconut Oil - Keeps the brownies moist and enhances the fudge texture. You can use a neutral oil if you prefer.
- Salt - Balances the sweetness in all the chocolate layers. It's in the brownie base as well as the dark, milk, and white chocolate mousses.
- Eggs - Bind ingredients together and add structure in the brownie base. Room temperature eggs blend more evenly.
- Vanilla Extract - Adds warmth and depth in the brownie base and in the white chocolate mousse. Vanilla bean paste or caviar works well too.
- Espresso Powder (optional) - Optional, but it deepens the chocolate flavor in the brownie layer without making it taste like coffee.
- All-Purpose Flour - Provides the brownie base with structure while keeping the texture fudgy. Use the spoon-and-sweep method for accurate measuring.
- Unsweetened Cocoa Powder - Boosts the chocolate flavor in the brownie base and adds a hint of bitterness to balance the sugars.
- Heavy Cream - Brings richness and creaminess to the mousses and ganache. It's divided between melting chocolate and whipped cream for each mousse layer, and is heated to melt the ganache chocolate. Whipping to soft peaks keeps the mousse airy.
- Dark Chocolate - Used in the dark chocolate mousse and the ganache topping. Choose 70% cocoa or higher for the best flavor and a smooth, glossy finish.
- Milk Chocolate - Used in the milk chocolate mousse for a creamier, sweeter flavor. Chop finely for even melting.
- White Chocolate - Used in the white chocolate mousse for a sweet, creamy layer. Melt gently because it's more heat-sensitive than other chocolates.
- Gelatin - Used in all three mousse layers to set the texture so they slice cleanly. It must be bloomed with water before using.
- Water - Used to bloom the gelatin in every mousse layer so it dissolves smoothly without lumps.
Be sure to see the free printable recipe card below for ingredients, exact amounts & instructions with tips!
👩🏻🍳 How To Make A Layered Chocolate Mousse Cake
Grab a 9" springform pan, mixing bowl, hand mixer or stand mixer, measuring utensils, and silicone spatula to get started.
A full 9-inch springform cake easily serves 18 slices, giving everyone a perfect portion of each of the 5 layers.
Bake The Brownie Base Layer
Prep and preheat. Preheat your oven to 350°F (175°C/Gas Mark 4) while you gather ingredients.


Mix brownie layer wet ingredients. Combine 1 cup (200 grams) sugar and ¾ cup (165 grams) light brown sugar in a large mixing bowl or the bowl of your stand mixer. Add melted ¾ cup (170.25 grams) butter and 1½ tablespoons coconut oil (photo 1) and stir again to combine (photo 2).


Add ¼ teaspoon salt, 3 large (150 grams) eggs (photo 3), 1 tablespoon vanilla extract, and the optional 1 teaspoon espresso powder. Stir to combine (photo 4).


Stir in dry ingredients. Sift ¾ cup (93.75 grams) all-purpose flour and ¾ cup (64.5 grams) unsweetened cocoa powder (photos 5 & 6) into the mixing bowl. Gently fold all of the ingredients together until they are well-combined (photo 7), but don't overmix.


Transfer batter into pan. Grease or line the bottom of your springform pan with parchment paper (photo 8). Pour in the brownie batter and spread to the edges for an even layer (photo 9).
Cook the brownie base. Bake at 350°F (175°C/Gas Mark 4) for 25 minutes or until a toothpick inserted in the center of the brownie base layer comes out clean (a few crumbs is fine, but no wet batter).


Cool and add collar. Let cool in the pan (photo 10) on a wire rack for 15 minutes, then add a collar of parchment paper around the brownie base layer (photo 11). Set aside while you make the chocolate mousse layers.
Make The Dark Chocolate Mousse Filling
Heat the cream. Warm the first 1 cup (236.58 milliliters) portion out of the 1¾ cups heavy cream in a small saucepan over medium-low heat just until it starts to steam and small bubbles form around the edges, then remove from heat.
🌟 Pro Tip: Heating Cream
The heavy cream used for of the cake layers (and the ganache) can be heated on the stove top or in the microwave. If using the microwave method, heat in short 30-second intervals on high and stir between each heating. Do not heat over 200°F/93°C for best results.


Melt the first chocolate layer. Add 9 ounces (255.15 grams) dark chocolate to a large mixing bowl. Pour in the heated cream (photo 12), 2 tablespoons sugar, and 1 pinch of salt (photo 13). Let melt for 3 minutes, then stir until smooth (photo 14).
🌟 Pro Tip: Temperature Is Key
When making the mousse, ensure your ingredients are at the right temperature. Melted chocolate should be warm but not hot when combined with other ingredients to prevent scrambling any eggs or deflating the whipped cream.


Prep the gelatin. In a small bowl, add 2 tablespoons water and sprinkle 2 teaspoons gelatin over the top. Let sit for 5 minutes undisturbed to bloom (photo 15), then stir until smooth (photo 16).
🌟 Pro Tip: Stabilizing The Mousse
The gelatin in this recipe helps to stabilize the mousse layers, ensuring they hold their shape. Make sure to bloom the gelatin properly as instructed for a smooth consistency.


Pour the gelatin into the chocolate ganache (photo 17) and mix until smooth (photos 18 & 19). Set aside.
🌟 Pro Tip: Whipping Cream
For the best results, use cold heavy cream and chill your mixing bowl and whisk attachment in the freezer beforehand. Whip the cream until soft peaks form; over-whipping can lead to a grainy texture.


Make whipped cream. Pour the second ¾-cup (177.44 milliliters) portion of heavy cream into a clean mixing bowl (photo 21). Whip until soft peaks have formed (photo 22).
🌟 Pro Tip: Folding Technique
When combining the whipped cream with the chocolate mixture, use a gentle folding motion with a spatula to avoid deflating the airy texture you've created.


Fold to combine. Gently fold the whipped cream into the chocolate ganache until fully combined (photos 22 & 23).
Transfer into cake collar. Add the dark chocolate mousse filling over the brownie base and smooth into an even layer (photo 24).
Make The Milk Chocolate Mousse Filling


Warm the first 1 cup (236.58 milliliters) portion of 1¾ cups heavy cream in a small saucepan as you did for the dark chocolate mousse. Combine the chopped 9 ounces (255.15 grams) milk chocolate and warmed cream in a large bowl (photo 25) and let it melt for 3 minutes.
Add 1 pinch salt and 2 tablespoons sugar to the chocolate (photo 26) and mix until smooth (photo 27).
Sprinkle 2 teaspoons gelatin into 2 tablespoons water and let sit for 5 minutes, then stir to combine.


Mix the gelatin into the milk chocolate ganache until smooth (photos 28 & 29).


Add the remaining ¾ cup (177.44 milliliters) of heavy cream to a mixing bowl and whip to soft peaks then add it to the mixing bowl with the ganache (photo 30). Gradually fold the whipped cream into the milk chocolate ganache until fully combined (photo 31).
Pour the milk chocolate mousse over the dark chocolate layer (photo 32).
Make The White Chocolate Mousse Filling


Finely chop 9 ounces (255.15 grams) white chocolate (photo 33) and add it to a large mixing bowl. Add the first heated 1 cup (236.58 milliliters) portion of the 1¾ cups heavy cream (photo 34), set aside for 3 minutes.


Add 2 tablespoons sugar, 1 pinch salt, and 1½ teaspoons vanilla extract (photo 35) and mix until smooth (photo 36).
Bloom the 2 teaspoons gelatin and 2 tablespoons water as before. Let sit for 5 minutes, stir to combine. Add the gelatin to the white chocolate ganache (photo 37) and mix until smooth.


Whip the remaining ¾ cup (177.44 milliliters) of heavy cream to soft peaks and gradually add portions to the white chocolate ganache (photo 38) and fold in gently to combine.


Pour the white chocolate mousse layer over the milk chocolate mousse layer (photos 40 & 41) .
Make The Chocolate Ganache Topping
🌟 Pro Tip: Smooth Ganache
For a smooth and glossy ganache, pour the hot cream over the finely chopped chocolate and let it sit for a few minutes before stirring gently with a whisk or spatula.


Combine heated 1 cup (236.58 milliliters) heavy cream and 8 ounces (226.8 grams) dark chocolate (photos 42 & 43), let melt for 3 minutes and stir to combine (photo 44). Let cool.


Pour the dark chocolate ganache over the white chocolate mousse layer (photo 45). Use the back side of a spoon to spread the chocolate to the edges of the cake (photo 46).
Chill, Slice & Serve
Chill in the fridge for at least 4 hours, preferably overnight.
Once set, remove the cake from the springform pan (photo 47) and carefully remove the parchment paper collar.
Grate extra milk chocolate and white chocolate onto the top of the 5-layer chocolate mousse cake, if desired, and serve.

>>>See All Of My Tasty Recipes Here!<<<
💭 Angela's Pro Tips & Recipe Notes
- A small amount of espresso powder makes dark chocolate taste even richer. It's optional and still tasty without it.
- For the perfect fudgy brownie base, make sure not to over-bake the brownie layer. Slightly under-baked, in fact, is best. A toothpick inserted into the center should come out with moist crumbs, not completely clean. The brownie will continue to set as it cools.
- Using high-quality chocolate is essential for the best flavor and texture in your mousse. Look for cooking chocolate rather than eating chocolate.
- To make a parchment paper collar, get a piece long enough to wrap around the inside of your springform pan. Lightly grease the sides of the pan to help the parchment stick, then press strip in place before clamping the sides back on the pan.
- Heat your heavy cream in the microwave, using 30 second increments on high heat, stirring to evenly spread the heated cream before heating again. Alternatively, you can also heat the cream in a saucepan on the stovetop.
- Do not overheat the cream, once it reaches the boiling point or higher in temperature, your chocolate sauce is more likely to seize or have an undesirable grainy texture.
- Keep the cake in the fridge as you make each layer of mousse. This will help it set and hold its shape.

🥡 Storing
Store the cake tightly covered in the refrigerator for up to 4 days to keep the mousse layers fresh and creamy. To prevent the cake from absorbing fridge odors, wrap it with plastic wrap or keep it in an airtight container.
Freezing
This cake can be frozen for up to 1 month if needed. Wrap it well in plastic wrap and then in aluminum foil to protect it from freezer burn. Thaw the cake overnight in the refrigerator before serving to maintain its texture and flavor.
Note: Mousse can freeze, but the texture might change slightly and become a bit grainy or watery after thawing due to the whipped cream. For the best results, enjoy the mousse fresh whenever possible. Avoid refreezing once thawed.

❔ Do I Have To Use Gelatin In The Mousse Layers
Using gelatin in the mousse layers is important to help the mousse set properly and hold its shape when sliced. I have successfully reduced the gelatin to half for a lighter texture, even when stacked with the full 3 mousse layers. Without gelatin, the mousse may be too soft or runny, especially in a layered cake like this. Alternatives like agar-agar, carrageenan, or pectin can be used for a vegan option, but they may change the texture of the mousse and require different preparation. For the best smoothness and stability, I recommend using gelatin.


Do you love a recipe you tried? Please leave a 5-star 🌟rating in the recipe card below and/or a review in the comments section further down the page.
Stay in touch with me through social media @ Pinterest, Facebook, Instagram, or Twitter! Subscribe to the newsletter today (no spam, I promise)! Don't forget to tag me when you try one of my recipes!
📖 Recipe Card

Layered Chocolate Mousse Cake
Ingredients
Fudge Brownie Base
- 1 cup sugar
- ¾ cup light brown sugar (firmly packed)
- ¾ cup butter (melted, cooled slightly)
- 1½ tablespoon coconut oil (or preferred cooking oil)
- ¼ teaspoon salt
- 3 large eggs (at room temperature)
- 1 tablespoon vanilla extract
- 1 teaspoon espresso powder (optional)
- ¾ cup all-purpose flour
- ¾ cup unsweetened cocoa powder
Dark Chocolate Mousse
- 1¾ cups heavy cream (divided - 1 cup and ¾ cup portions)
- 9 oz dark chocolate (finely chopped - 70% cocoa or higher is recommended)
- 2 tablespoon sugar
- 1 pinch salt
- 2 teaspoon gelatin (1 packet of unflavored gelatin)
- 2 tablespoon water (for the gelatin)
Milk Chocolate Mousse
- 1¾ cups heavy cream (divided - 1 cup and ¾ cup portions)
- 9 oz milk chocolate (finely chopped)
- 2 tablespoon sugar
- 1 pinch salt
- 2 teaspoon gelatin (1 packet of unflavored gelatin)
- 2 tablespoon water (for the gelatin)
White Chocolate Mousse
- 1¾ cups heavy cream (divided - 1 cup and ¾ cup portions)
- 9 oz white chocolate (finely chopped)
- 2 tablespoon sugar
- 1 pinch salt
- 1½ teaspoon vanilla extract (extract, paste, or vanilla bean caviar)
- 2 teaspoon gelatin (1 packet of unflavored gelatin)
- 2 tablespoon water (for the gelatin)
Chocolate Ganache Topping
- 1 cup heavy cream (heated to just under 200°F/93°C)
- 8 oz dark chocolate (finely chopped - 70% cocoa or higher is recommended)
(Note: 2x or 3x only changes the ingredient list)
Instructions
Bake The Brownie Base Layer
- Preheat your oven to 350°F (175°C/Gas Mark 4).
- Combine 1 cup sugar and ¾ cup light brown sugar in a large mixing bowl or the bowl of your stand mixer. Add melted ¾ cup butter and 1½ tablespoon coconut oil and stir again to combine.
- Add ¼ teaspoon salt, 3 large eggs, 1 tablespoon vanilla extract, and the optional 1 teaspoon espresso powder. Stir to combine.
- Sift ¾ cup all-purpose flour and ¾ cup unsweetened cocoa powder into the mixing bowl. Gently fold all of the ingredients together until they are well-combined, but don't overmix.
- Grease or line the bottom of your springform pan with parchment paper. Pour in the brownie batter.
- Bake at 350°F (175°C/Gas Mark 4) for 25 minutes or until a toothpick inserted in the center of the brownie base comes out clean (a few crumbs is fine, but no wet batter).
- Let cool in the pan for 15 minutes, then add a collar of parchment paper around the brownie base layer. Set aside while you make the chocolate mousse layers.
Dark Chocolate Mousse
- Warm the first 1 cup portion out of the 1¾ cups heavy cream in a small saucepan over medium-low heat just until it starts to steam and small bubbles form around the edges, then remove from heat.
- Add 9 oz dark chocolate to a large mixing bowl. Pour in the heated cream, 2 tablespoon sugar, and 1 pinch salt. Let melt for 3 minutes, then stir until smooth.
- In a small bowl, add 2 tablespoon water and sprinkle 2 teaspoon gelatin over the top. Let sit for 5 minutes undisturbed to bloom, then stir until smooth.
- Pour the gelatin into the chocolate ganache and mix until smooth. Set aside.
- Pour the second ¾-cup portion of heavy cream into a clean mixing bowl. Whip until soft peaks have formed.
- Gently fold the whipped cream into the chocolate ganache until fully combined.
- Add the dark chocolate mousse to the brownie base and smooth into an even layer.
Milk Chocolate Mousse
- Warm the first 1 cup portion of 1¾ cups heavy cream in a small saucepan as you did for the dark chocolate mousse. Combine the chopped 9 oz milk chocolate and warmed cream in a large bowl and let it melt for 3 minutes.
- Add 1 pinch salt and 2 tablespoon sugar to the chocolate and mix until smooth.
- Sprinkle 2 teaspoon gelatin into 2 tablespoon water and let sit for 5 minutes, then stir to combine.
- Mix the gelatin into the milk chocolate ganache until smooth.
- Add the remaining ¾ cup of heavy cream to a mixing bowl and whip to soft peaks. Gradually fold the whipped cream into the milk chocolate ganache until fully combined.
- Pour the milk chocolate mousse over the dark chocolate layer.
White Chocolate Mousse
- Finely chop 9 oz white chocolate and add it to a large mixing bowl. Add the first heated 1 cup portion of the 1¾ cups heavy cream, set aside for 3 minutes.
- Add 2 tablespoon sugar, 1 pinch salt, and 1½ teaspoon vanilla extractand mix until smooth.
- Bloom the 2 teaspoon gelatin and 2 tablespoon water as before. Let sit for 5 minutes, stir to combine. Add the gelatin to the white chocolate ganache and mix until smoothe.
- Whip the remaining ¾ cup of heavy cream to soft peaks and gradually add portions to the white chocolate ganache and fold in gently to combine.
- Pour the white chocolate mousse layer over the milk chocolate mousse layer.
Chocolate Ganache Topping
- Combine heated 1 cup heavy cream and 8 oz dark chocolate, let melt for 3 minutes and stir to combine. Let cool.
- Pour the dark chocolate ganache over the white chocolate mousse layer. Use the back side of a spoon to spread the chocolate to the edges of the cake.
Chill & Serve
- Chill in the fridge for at least 4 hours, preferably overnight.
- Once set, remove the cake from the springform pan and carefully remove the parchment paper collar.
- Grate extra milk chocolate and white chocolate to top the cake, if desired, and serve.
Notes
- A small amount of espresso powder will enhance the dark chocolate flavor, but it's optional.
- For a fudgy texture, slightly under-bake the brownie base. A toothpick should come out with moist crumbs attached.
- For the best flavor and texture in the mousse and ganache, use high-quality cooking chocolate.
- Grease the inside of the springform pan to help a long strip of parchment paper stick in place, creating a collar for the layers.
- Heat the cream on the stovetop or in the microwave in 30-second intervals. Do not let it boil, as this can cause the chocolate to seize.
- Keep the cake refrigerated while preparing each mousse layer to help it set properly and maintain its shape.
- Wrap in plastic cling film when storing to avoid fridge or freezer odors.
Angela Latimer says
It's easier than it looks, plenty of instructions to make sure that it can be replicated at home to get rave reviews when you make it too. ~ Angela